Your sprinkler system spent the summer full of water, and most of that water is still sitting in the pipes, valves and heads. When the ground freezes, that water turns to ice, and in spring you find cracked fittings, geysers in the lawn or a split backflow preventer that has to be replaced.
This guide walks you through how to winterize a sprinkler system from start to finish: shutting off the water and controller, choosing between manual drain, automatic drain and blow-out methods, protecting the backflow preventer, staying safe with compressed air, and knowing when a pro is the better call.
Quick answer: Shut off the water to the irrigation system and set the controller to rain or off mode. Then get the water out by opening the manual drain valves, letting automatic drains do the work, or blowing out each zone with compressed air at or below your manufacturer’s pressure limit. Drain the backflow preventer, set its valves at 45 degrees and insulate it. If you don’t have a large compressor, a pro blow-out typically costs about $59 to $144.
Why sprinkler systems need winterizing
Irrigation pipes are usually buried only a short way below the surface, often well above the depth where the ground freezes. Valves, sprinkler heads and fittings hold small pockets of water too. As that water freezes and expands, it can crack PVC, split poly pipe and break the plastic bodies of heads and valves.
The most exposed part is the backflow preventer, the brass assembly that usually sits above ground near the house. It’s also one of the most expensive parts to replace, so it deserves extra attention no matter which drain method you use.
When to winterize
Aim for the window after your lawn stops growing and before the first hard freeze. Colder regions need to start earlier, and systems with above-ground parts should be done sooner than systems that are fully buried. If you plan to hire a pro, book early, since fall schedules fill up quickly.
Tools and materials
- Safety glasses (required for any drain or blow-out work) and hearing protection
- A flat screwdriver for the backflow preventer’s test cocks
- A pipe wrench or long valve key if your shutoff is in a ground box
- Your controller and system manuals, or the installer’s notes
- For blow-out only: a high-volume air compressor, an air hose and an adapter that fits your system’s blow-out port
- An insulated backflow cover, foam pipe insulation or old towels
- A bucket and rags for draining
Step 1: Shut off the water to the system
Find the irrigation shutoff valve. In colder climates it’s often in the basement where the sprinkler line tees off the main water line. In other homes it sits in an underground box near the water meter or close to the backflow preventer. Turn it fully closed.
If your system runs from a pump or well, switch off the pump’s power at the breaker as well, and drain the pump following its manufacturer’s instructions. Running a pump against a drained, empty system can damage it.
Step 2: Set the controller to rain or off mode
Switch the controller to its rain, off or winter mode. This stops it from trying to water all winter while keeping your zone times and schedules saved for spring. If you plan to use the controller to cycle zones during a blow-out, leave it powered until you’ve finished.
Step 3: Choose your drain method
There are three ways to get water out of the lines. The right one depends on how your system was built and how cold your winters get.
| Method | How it works | Best for | DIY difficulty |
|---|---|---|---|
| Manual drain | You open drain valves installed at the low points of the lines | Systems built with manual drain valves | Easy |
| Automatic drain | Drain valves open by themselves when water pressure drops | Systems built with automatic drain valves | Easy |
| Blow-out | A compressor pushes air through each zone to force water out | Cold climates and systems with no drain valves | Advanced; needs a large compressor |
Many contractors recommend the blow-out method in freezing climates because it’s the most thorough. The drain methods are simpler but can leave water in low spots, valves and heads.
Manual drain method
- Make sure the water supply is off.
- Locate the manual drain valves at the low points and ends of each line. They’re often under small valve-box lids in the lawn.
- Put on safety glasses. Open each drain valve slowly, since the line may still be under pressure and can spray.
- Let each line drain completely before moving on.
- Run each zone briefly from the controller to relieve pressure and let water escape from the valves.
- Drain the backflow preventer as described below. Installers differ on whether manual drains stay open or get closed for winter, so follow your installer’s or manufacturer’s instructions.
Automatic drain method
Automatic drain valves open when the pressure in the line drops below a set point. Shut off the water, then run one zone for a moment to relieve the pressure so the drains open and empty the lines.
Water can still stay trapped in the zone valves themselves. Loosen the solenoid on each valve by hand to let that water out, then hand-tighten it again. Drain the backflow preventer separately, and check your manufacturer’s directions, since some systems still need a blow-out in very cold areas.
Blow-out method
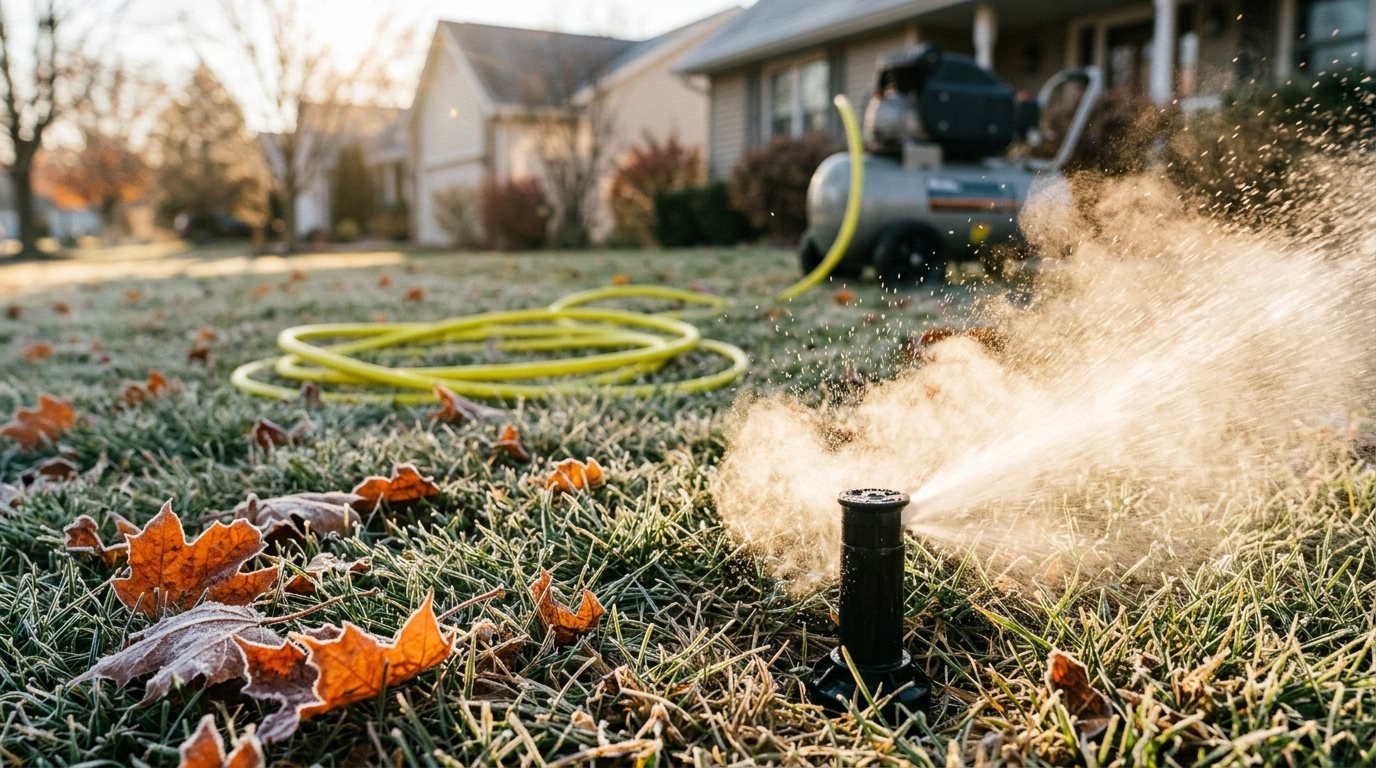
Blowing out a system uses compressed air to push water out of every zone. It works well, but it also carries the most risk of damage and injury if it’s done wrong, so read the safety section below before you start.
Check the compressor first. Rain Bird’s blow-out guidance calls for a 50 to 70 gallon compressor that can maintain 185 cfm or more of continuous airflow. A typical garage compressor can’t keep up, so many homeowners either rent a towable unit or hire a pro.
- Shut off the water supply and close the two isolation valves on the backflow preventer so no air passes through it.
- With the compressor off, connect the air hose to the blow-out port, which sits downstream of the backflow preventer.
- Set the compressor’s regulator to your system’s limit. Rain Bird says air pressure should not exceed 50 psi.
- Open a zone at the controller before you start the compressor, so the air always has somewhere to go. Start with the zone farthest from the compressor.
- Run that zone until only a fine mist comes out of the heads, but no longer than 2 minutes at a time, then move to the next zone.
- Repeat the full cycle two or more times until every zone only puts out mist.
- With one zone still open, shut off the compressor, let the pressure bleed out, disconnect the hose, and then switch the controller off.
Blow-out safety: what not to do
Compressed air stores far more energy than water at the same pressure, and a blow-out can send grit, water and broken parts flying out of the heads. Treat it like any other power tool job.
- Always wear eye protection. Safety glasses protect you from debris and from spray when you open pressurized drain valves.
- Never stand over or lean across a sprinkler head while air is running, and keep children and pets away from the zone being blown out.
- Stay within the pressure limit from your system’s manufacturer or installer. Some guides allow up to 80 psi for rigid PVC and 50 psi for poly pipe, but Rain Bird’s limit is 50 psi, and when in doubt, use the lower number.
- Never push air into a closed system. Always open a zone before starting the compressor and keep one open until it’s off.
- Don’t over-blow a zone. Moving air heats up, and Rain Bird warns that running air too long through gear-drive rotors can melt the rotor heads.
- Keep air out of the backflow preventer. High-pressure air can damage its internal parts.
Safety note: If you’ve never done a blow-out, don’t know whether your pipe is PVC or poly, or can’t find your manufacturer’s pressure limit, hire an irrigation pro. A mistake can crack pipe underground or injure someone standing nearby, and the repair costs far more than the service call.
How to protect the backflow preventer
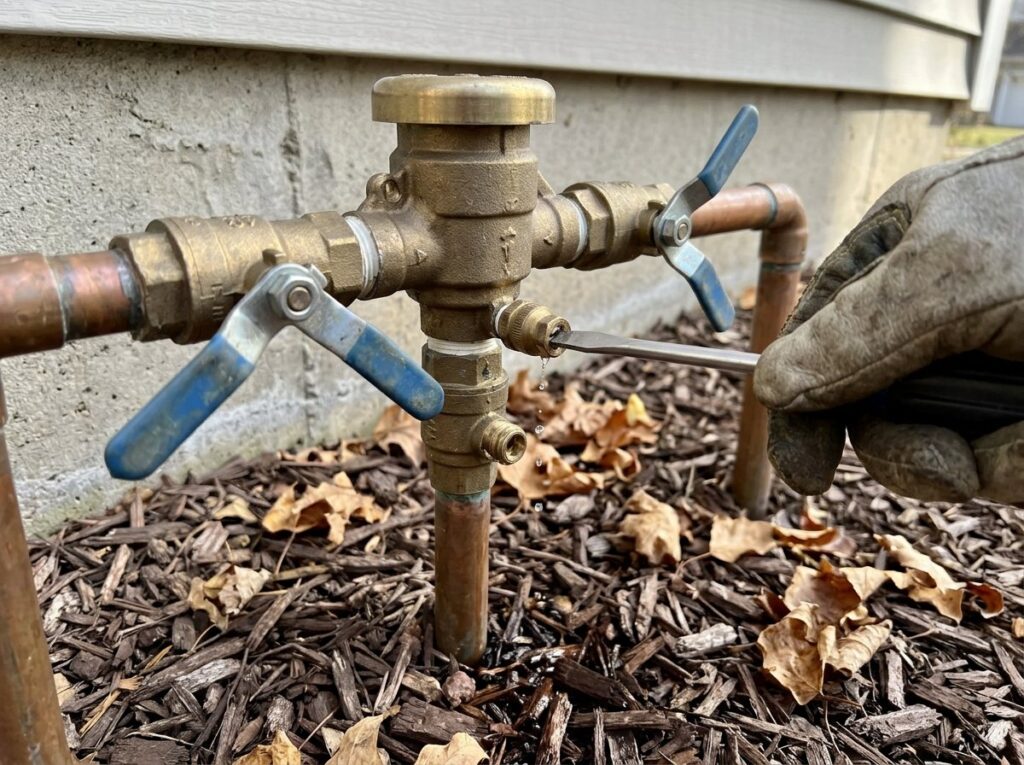
The backflow preventer keeps irrigation water from flowing back into your drinking water. It’s usually a brass assembly with two quarter-turn valve handles and several small screw-slotted test cocks. Because it sits above ground, it’s the part most likely to freeze.
The Salt Lake City Public Utilities winterizing guide recommends these steps:
- Confirm the water to the sprinkler system is shut off at the main or stop-and-waste valve.
- Open each test cock with a flat screwdriver, about a quarter turn, to drain the device.
- Turn both shutoff valves on the assembly to a 45-degree position, halfway between open and closed, so no water gets trapped inside the ball.
- Drain the section of pipe between the main shutoff and the backflow preventer.
- Wrap the unit with an insulated cover, towels or an old blanket. Don’t block any vents or drain openings.
If your backflow preventer was installed with unions, you can also remove it, drain it and store it indoors for the winter.
Drip lines, pumps and other parts
Drip irrigation
Drip systems hold less water but still freeze. Open the end caps or flush valves to drain the lines, and remove the filter and pressure regulator assembly so you can store it inside. If you blow out drip lines, use only the low pressure the drip manufacturer allows.
Hose bibs and exposed pipe
Wrap any above-ground irrigation pipe with foam insulation, and winterize the hose bibs on the house at the same time. Our guide on how to winterize outdoor faucets covers that job step by step, and you can find more cold-weather plumbing tips in how to prevent frozen pipes.
Antifreeze
Don’t pour antifreeze into irrigation lines. The American Red Cross advises against putting antifreeze in sprinkler supply lines unless the manufacturer or installer directs it, since these lines connect to your drinking water supply.
When to call a pro
Draining a system with built-in drain valves is a reasonable DIY job. Call an irrigation contractor if any of these apply:
- Your system has no drain valves and you don’t have access to a large enough compressor
- You don’t know your pipe type or the manufacturer’s pressure limit
- You can’t find the irrigation shutoff, or it won’t close fully
- The backflow preventer is leaking, cracked or wouldn’t drain
- The system runs from a well or booster pump
- Your system warranty requires professional service
- You saw signs of freeze damage last spring, such as soggy patches, geysers or a zone with weak pressure
Pro winterization is one of the cheaper irrigation services. These are typical ranges from published cost guides:
| Service | Typical cost | Source |
|---|---|---|
| Professional sprinkler winterization | $59 to $144 | LawnStarter |
| Professional blow-out, average | About $85 (range about $60 to $145) | Lawn Love |
Prices rise with the number of zones and the size of the property. Many companies bundle fall shutdown with a spring start-up visit, which can be worth it if you don’t want to handle either job.
Frequently asked questions
Do I have to blow out my sprinkler system, or can I just drain it?
If your system has manual or automatic drain valves and your winters are moderate, draining may be enough. In colder climates, or in systems built without drain valves, a blow-out is the most reliable way to clear water from every zone. When you’re not sure how your system was designed, ask the installer.
What PSI should I use to blow out sprinklers?
Use the limit from your system’s manufacturer or installer. Rain Bird says air pressure should not exceed 50 psi, and many guides cap poly pipe at 50 psi and rigid PVC at 80 psi. Lower pressure with good airflow clears water more safely than high pressure from a small compressor.
Can I use a shop vacuum instead of an air compressor?
A shop vacuum isn’t a reliable substitute. It can’t move enough air through long underground lines to push the water out of every head and low spot. Use your system’s drain valves or hire a pro with the right compressor instead.
How do I know my sprinkler system was properly winterized?
After a blow-out, every zone should put out only a fine mist with no spurts of water. The water should be off, the controller in rain or off mode, and the backflow preventer drained with its test cocks open and its valves at 45 degrees.
How do I turn my sprinkler system back on in spring?
Wait until the risk of hard freezes has passed. Close the test cocks and any open drain valves, open the main irrigation valve slowly, then turn the backflow preventer’s valves fully open, one at a time, so a rush of water doesn’t hammer the pipes. Run each zone and check for leaks, broken heads and weak spray.
The bottom line
To winterize a sprinkler system, shut off the water, put the controller in rain mode, get the water out with drain valves or a careful blow-out, and drain and insulate the backflow preventer. Stay within your manufacturer’s pressure limit, wear eye protection and never stand over a head during a blow-out. If your system needs a blow-out and you don’t have the equipment, a pro visit is inexpensive insurance. Add it to your fall home maintenance checklist so it happens every year.