
Category: Kitchen & Bathroom

Fixtures, caulk, grout, cabinets and appliances for the hardest-working rooms in your home.

  • Garbage Disposal Not Working? How to Fix Jams, Hums and Leaks

    Garbage Disposal Not Working? How to Fix Jams, Hums and Leaks

    You flip the switch and hear a low hum, or nothing at all. Or the disposal runs but the sink stays full, or there’s a puddle in the cabinet underneath. A garbage disposal problem can bring kitchen cleanup to a halt, but most issues are easy to fix in a few minutes with tools you probably already own.

    This guide covers the most common garbage disposal problems, how to diagnose each one safely, and the exact steps to fix jams, resets, leaks, clogs and smells. You’ll also learn what not to put down the disposal and how to tell when it’s time for a replacement.

    Quick answer: If the disposal hums but doesn’t spin, it’s jammed: turn off the power, insert a 1/4-inch hex wrench into the socket on the bottom and work it back and forth, remove any object with tongs, then press the red reset button. If it’s completely silent, press the reset button and check the breaker. Leaks from the bottom of the unit usually mean it needs replacing.

    Safety first

    Safety note: Never put your hand inside a garbage disposal, even when it’s off. Before any troubleshooting that involves reaching into the sink opening or working under the unit, turn off the wall switch and unplug the disposal, or switch off its breaker. Use tongs or pliers to remove objects, and a flashlight to look inside.

    Problem 1: The disposal hums but doesn’t spin

    A humming sound means the motor is getting power but the flywheel inside is stuck. Usually something hard, like a fruit pit, bone, bottle cap or utensil, is wedged between the flywheel and the grinding ring. Running a jammed disposal can overheat the motor, so turn it off right away.

    1. Turn off the power at the switch and unplug the unit or turn off the breaker.
    2. Find the hex socket in the center of the bottom of the disposal. Most units have one.
    3. Insert a 1/4-inch hex wrench (many disposals come with one, often called a jam-buster wrench). Work it back and forth, then in full circles, until the flywheel moves freely.
    4. Remove the obstruction. Shine a flashlight into the sink opening and pull out any loose object with tongs or pliers.
    5. Press the reset button, usually a small red button on the bottom of the unit.
    6. Restore power, run cold water and turn the disposal on.

    If your disposal doesn’t have a hex socket, you can often free the flywheel from above by turning it gently with a sturdy wooden spoon handle or a disposal tool, with the power off.

    Hand inserting a hex wrench into the bottom of a garbage disposal

    Problem 2: The disposal is completely silent

    No sound at all means it isn’t getting power, or it shut itself off.

    • Press the reset button. Disposals have a thermal overload protector that trips if the motor overheats, often after a jam. Wait a few minutes for the motor to cool, then press the red button on the bottom firmly until it clicks.
    • Check the breaker. Look for a tripped breaker in your electrical panel and reset it once.
    • Check the outlet. If the disposal plugs into an outlet under the sink, test the outlet with a lamp or phone charger. If it’s on a GFCI circuit, press the reset button on the nearest GFCI outlet.
    • Check the switch. A worn wall switch can fail. If everything else checks out, the switch may be the problem, which is a job for someone comfortable with electrical work.

    If the reset button keeps tripping, the motor may be overheating from a partial jam or failing internally.

    Problem 3: The disposal runs, but the sink drains slowly

    When the disposal sounds normal but water backs up, the clog is usually in the drain line or the P-trap below the disposal, not in the disposal itself.

    1. Run the disposal with a strong flow of cold water for 30 seconds to clear what it can.
    2. Turn off the power and place a bucket under the drain pipe.
    3. Loosen the slip nuts on the P-trap, remove it, and clean out food buildup.
    4. Check the pipe leading from the disposal and the pipe going into the wall. A small hand auger can clear a clog further down.
    5. Reassemble and test with water.

    Avoid chemical drain cleaners in a disposal. They can damage the unit and create a hazard for anyone who works on it afterward.

    Problem 4: The disposal is leaking

    Dry off the unit and the pipes with a towel, put a dry paper towel underneath, run water and watch where the drip starts.

    Where it leaksLikely causeFix
    Top, where the disposal meets the sinkLoose mounting or failed plumber’s putty at the sink flangeTighten the mounting ring; reseal the flange if needed
    Side, at the dishwasher hoseLoose clamp or worn hoseTighten the clamp or replace the hose
    Side, at the discharge pipeWorn gasket or loose boltsTighten bolts or replace the gasket
    Bottom of the unitInternal seal failure or cracked housingUsually requires replacing the disposal

    Problem 5: The disposal smells bad

    Food residue builds up on the grinding chamber and under the rubber splash guard. To freshen it:

    • Grind a cup of ice cubes with a small handful of coarse salt to scour the chamber.
    • Scrub the underside of the rubber splash guard with an old toothbrush and dish soap.
    • Grind a few small pieces of lemon or orange peel for a fresh scent.
    • Pour baking soda followed by white vinegar down the drain, let it fizz for a few minutes, then rinse with cold water while running the disposal.

    Problem 6: It runs but grinds poorly

    If food takes a long time to grind or the unit sounds strained, you may be overloading it or using too little water. Feed food in gradually with a steady stream of cold water. If performance doesn’t improve, the grinding components may be worn, especially on an older or lower-powered unit.

    Problem 7: Loud grinding, rattling or vibration

    A sudden metal-on-metal grinding noise usually means something hard is bouncing around in the chamber, such as a coin, bottle cap or small bone. Turn the disposal off immediately, cut the power, and look inside with a flashlight. Remove the object with tongs. If the noise continues with nothing in the chamber, the mounting may have loosened, letting the unit vibrate against the cabinet or pipes, or internal bearings may be wearing out. Check that the mounting ring under the sink is fully locked and the discharge pipe is tight. A disposal that rattles loudly even when empty is often near the end of its life.

    Problem 8: The dishwasher drains into the sink

    If your dishwasher drains through the disposal and water backs up into the sink during a cycle, first run the disposal to clear food from the chamber, since the dishwasher hose empties into it. On a newly installed disposal, check that the knockout plug inside the dishwasher inlet was removed; if it wasn’t, the dishwasher can’t drain at all. Also make sure the drain hose has a high loop or an air gap so dirty sink water can’t flow back into the dishwasher.

    What not to put down a garbage disposal

    • Grease, oil and fat: they coat pipes and solidify into clogs.
    • Fibrous foods: celery, corn husks, artichokes and onion skins can wrap around parts.
    • Starchy foods in bulk: pasta, rice and large amounts of potato peels can swell or form a paste.
    • Bones and fruit pits: hard items can jam the flywheel.
    • Coffee grounds in large amounts: they can settle in pipes and build up.
    • Non-food items: twist ties, utensils, glass and paper.

    How to use your disposal so it lasts

    • Run cold water before, during and for about 15 seconds after grinding.
    • Feed food in small amounts rather than all at once.
    • Use it regularly; disposals that sit unused can rust or seize.
    • Clean the splash guard and chamber every couple of weeks.
    • Scrape plates into the trash or compost first, and use the disposal only for small scraps.

    Repair or replace?

    Many disposals last around a decade or more, depending on the model and how they’re used. Consider replacing yours if it leaks from the bottom, trips its reset button constantly, jams frequently, or is more than about 10 years old and struggling. When you replace it, matching the same brand’s mounting system can make installation much easier. Because disposals involve both plumbing and electrical connections, hire a pro if you’re not comfortable with either.

    Frequently asked questions

    Where is the reset button on a garbage disposal?

    Usually on the bottom of the unit, under the sink. It’s typically a small red button. Press it firmly after the motor has cooled for a few minutes.

    What size wrench do I need to unjam a disposal?

    Most models use a 1/4-inch hex (Allen) wrench in the socket at the bottom of the unit.

    Is it safe to use drain cleaner in a garbage disposal?

    It’s not recommended. Chemical cleaners can damage the disposal and pose a serious burn risk to anyone who later works on the unit or the drain.

    Can I put eggshells down the disposal?

    Opinions vary. Small amounts may be fine in some units, but the membrane can wrap around parts and the fine grit can contribute to clogs. Composting or trashing them is the safer option.

    Should I use hot or cold water with a disposal?

    Cold water. It keeps grease solid so it can be chopped and flushed instead of melting and coating the pipes.

    The bottom line

    Most garbage disposal problems come down to a jam, a tripped reset button, a clog below the unit or a loose connection. Always cut the power first, use a hex wrench and the reset button for jams, clean the P-trap for slow drains, and watch exactly where a leak starts. Use the disposal with plenty of cold water and keep problem foods out, and it’ll keep your kitchen running smoothly for years.

  • How to Recaulk a Bathtub Like a Pro

    How to Recaulk a Bathtub Like a Pro

    Fresh caulk can make a tired bathroom look almost new. Old caulk, on the other hand, cracks, pulls away, turns yellow, and grows black mildew that no amount of scrubbing will remove. More importantly, failing caulk lets water seep behind your tub and tile, where it can rot the wall framing, damage the subfloor and feed hidden mold.

    Recaulking a bathtub is one of the most satisfying DIY jobs in the house. It costs very little, takes an afternoon, and with the right technique, your bead will look as clean as a professional’s. This guide covers choosing the right caulk, removing the old stuff completely, and applying a smooth, watertight bead that lasts.

    Quick answer: Remove every bit of old caulk, clean and disinfect the joint, and let it dry completely. Fill the tub with water so it settles to its lowest position, tape both sides of the joint, and apply a steady bead of 100% silicone or kitchen-and-bath caulk. Smooth it with a wet fingertip or tool, pull the tape right away, and let it cure fully before showering.

    When should you recaulk a bathtub?

    • The caulk is cracked, peeling or pulling away from the tub or tile.
    • There are gaps you can see into, or you can push the caulk in with a fingernail.
    • Black or pink mildew is growing inside or under the caulk, not just on the surface.
    • The caulk is discolored and cleaning no longer helps.
    • You notice water stains on the ceiling below the bathroom or soft spots in the floor near the tub, which can mean water is getting through.

    As a general rule, inspect tub caulk once a year. Many homes need fresh caulk every few years, depending on use and ventilation.

    Choosing the right caulk

    TypeProsConsBest for
    100% siliconeVery flexible, highly water resistant, long lasting, mildew-resistant versions availableNot paintable, harder to tool, cleanup needs solvent or wipingTub-to-tile and shower joints
    Siliconized acrylic latexEasy to apply and smooth, water cleanup, paintableLess flexible and durable in constantly wet areasTrim, sink backsplashes, dry areas
    Hybrid or polymer formulasGood flexibility and adhesion, some are paintableCost more, check the label for wet-area useWet areas where paintability matters

    For a bathtub, look for a product labeled for kitchen and bath or tub and tile use, with mildew resistance. One hundred percent silicone is the most popular choice for the tub-to-wall joint because it stays flexible as the tub moves.

    Tools and materials

    • Caulk and a caulk gun (or a squeeze tube for small jobs)
    • Plastic caulk removal tool, utility knife or razor scraper
    • Caulk softener or remover (optional, helpful for stubborn caulk)
    • Mildew cleaner or a diluted bleach solution, plus a scrub brush
    • Rubbing alcohol and clean, lint-free rags
    • Painter’s tape
    • Gloves, and a caulk smoothing tool if you prefer not to use your finger

    How to recaulk a bathtub: step by step

    Step 1: Remove all of the old caulk

    New caulk won’t bond to old caulk, so this step matters more than any other. Slice along both edges of the old bead with a utility knife or caulk tool, then pull it out in strips. Scrape off what remains with a plastic scraper. On acrylic or fiberglass tubs, avoid metal blades that could scratch the surface. A caulk softener applied a couple of hours ahead can make stubborn silicone easier to remove.

    Step 2: Clean off residue and mildew

    Silicone leaves a thin, slick film that will stop new caulk from sticking. Wipe the joint with rubbing alcohol on a rag until it no longer feels slippery. If there’s mildew in the joint, scrub it with a mildew cleaner or a diluted bleach solution, following the product directions and ventilating the room well. Never mix bleach with ammonia or other cleaners. Rinse and wipe the area clean.

    Safety note: Wear gloves and eye protection when using mildew cleaners or bleach, keep the window open or the fan running, and keep children and pets out of the bathroom while you work.

    Step 3: Let it dry completely

    Caulk needs a dry surface to bond. Ideally, wait 24 hours after cleaning with the exhaust fan running. A hair dryer on a low setting can speed things up. Moisture trapped behind fresh caulk is a common reason new caulk fails or mildew returns quickly.

    Step 4: Fill the tub with water

    This pro trick makes a big difference. A filled tub settles slightly under the weight, which widens the joint to its largest size. If you caulk with the tub full, the caulk won’t be stretched and torn later when someone stands in it. Leave the water in until the caulk has cured.

    Step 5: Tape the joint

    Run painter’s tape along the tub and along the wall, leaving a gap about the width you want your bead, usually 1/8 to 1/4 inch. Tape is the secret to perfectly straight lines.

    Gloved fingertip smoothing silicone caulk along a bathtub joint

    Step 6: Cut the nozzle and apply the bead

    Cut the caulk tube’s tip at a 45-degree angle, starting with a small opening. You can always cut more. Hold the gun at a steady angle and push or pull it along the joint at an even speed while squeezing gently, so the bead fills the gap without big blobs. Work in sections of a few feet at a time, and do one wall at a time.

    Step 7: Smooth the bead

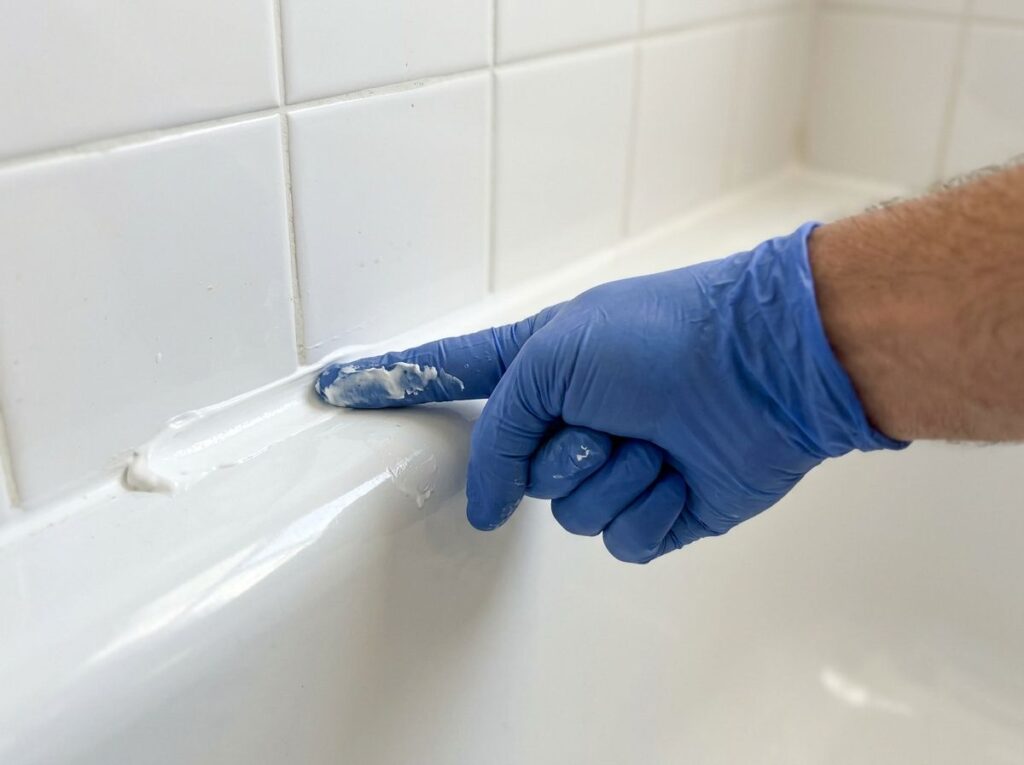
    Right after applying each section, smooth the caulk with a fingertip dipped in water (for silicone, a little dish soap in the water helps) or a caulk smoothing tool. Use one continuous, light pass to press the caulk into the joint and create a slightly concave surface. Wipe excess off your finger or tool often.

    Step 8: Remove the tape immediately

    Pull the tape while the caulk is still wet, pulling slowly at an angle away from the bead. If you wait until it dries, the tape can tear the edge of the bead. Lightly re-smooth any edge that lifts.

    Step 9: Let it cure fully

    Check the label for cure time. Many silicone caulks need around 24 hours before they’re exposed to water, and some need longer in cool or humid conditions. Keep the shower off and the fan running, then drain the tub after the caulk has cured.

    Dealing with large gaps

    If a gap is wider than about 1/4 inch, caulk alone may sag or crack. Press a foam backer rod into the gap first, so it sits slightly below the surface, then caulk over it. If gaps are very wide or keep reappearing, the tub may be moving too much, which a contractor should check.

    Caulking other spots in the bathroom

    While your caulk gun is loaded, check the rest of the bathroom. The same technique works for the joint where the sink or vanity top meets the wall, around the base of the toilet (many pros leave a small gap at the back so a leak can show itself instead of hiding under the toilet), inside shower corners where tile walls meet, and around the edges of a shower pan or door frame. Remove old caulk, clean, dry, tape and apply a smooth bead in the same way. Avoid caulking over joints that are designed to drain, such as weep holes at the bottom of some shower door tracks.

    Common caulking mistakes

    • Caulking over old caulk. It looks fine for a few weeks, then peels.
    • Skipping the alcohol wipe. Silicone residue prevents a good bond.
    • Caulking a damp joint. Trapped moisture leads to failure and mildew.
    • Cutting the nozzle too big. A large bead is messy and hard to smooth.
    • Going back over semi-dry caulk. Once it starts to skin over, more tooling makes it lumpy.
    • Using the shower too soon. Water before curing weakens the bead.

    Keep your new caulk looking fresh

    • Run the exhaust fan during showers and for at least 20 minutes afterward.
    • Squeegee or wipe down the tub and tile after showers.
    • Clean the caulk lines regularly with a gentle bathroom cleaner before mildew can take hold.
    • Inspect the caulk every year and spot-repair small gaps before they grow.

    When to call a professional

    Recaulking fixes surface gaps, but it can’t fix water damage that’s already happened. Call a pro if tiles are loose or sound hollow, the wall behind the tub feels soft, grout is crumbling widely, there’s a musty smell you can’t trace, or water is staining the ceiling below. These signs can mean water has been getting into the wall for some time.

    Frequently asked questions

    How often should you recaulk a bathtub?

    Inspect it yearly and recaulk whenever it cracks, peels or grows mildew under the surface. Many bathrooms need fresh caulk every few years.

    Silicone or latex caulk for a bathtub?

    For the tub-to-tile joint, 100% silicone or a kitchen-and-bath rated caulk is usually the better choice because it stays flexible and resists water. Latex is easier to work with and paintable but less durable in constantly wet areas.

    Can I caulk over old caulk?

    No. New caulk doesn’t bond well to old caulk, especially silicone. Remove it completely and clean the surface first.

    Why does mold come back under new caulk?

    Usually because the joint wasn’t fully cleaned and dried before caulking, or because the bathroom stays humid. Clean thoroughly, dry for 24 hours, and improve ventilation.

    How long before I can shower after caulking?

    Follow the label. Many silicone caulks recommend about 24 hours, sometimes longer in humid conditions.

    The bottom line

    A long-lasting caulk job is all about preparation: remove every trace of old caulk, clean off residue and mildew, dry the joint completely and fill the tub before you start. Then tape, apply a steady bead, smooth it once and pull the tape right away. Give it time to cure, and you’ll have a clean, watertight seal that protects your bathroom for years.