Category: Plumbing

Leaks, clogs, water heaters, toilets and faucets: step-by-step plumbing fixes for every home.

  • How to Flush a Water Heater: A Step-by-Step Guide

    How to Flush a Water Heater: A Step-by-Step Guide

    Your water heater works hard every day, and over time it quietly collects a layer of sediment at the bottom of the tank. Minerals from your water, mostly calcium and magnesium, settle out as the water heats. That layer makes the heater less efficient, noisier and more likely to fail early. Flushing the tank once a year is one of the simplest maintenance jobs you can do to protect it.

    This step-by-step guide shows you how to flush a tank water heater safely, whether it’s gas or electric. It also covers the warning signs that your tank needs attention, a few extra checks to do while you’re at it, and how to descale a tankless unit.

    Quick answer: Turn off the power or set the gas to pilot, shut off the cold water supply, connect a garden hose to the drain valve, open a hot water faucet, and drain the tank. Briefly turn the cold supply back on to stir up sediment until the water runs clear. Close the valve, refill the tank completely, and only then restore power or gas.

    Why flushing your water heater matters

    Sediment causes several problems at once. On a gas water heater, it sits between the burner flame and the water, so the heater has to work longer to deliver the same hot water. On an electric heater, sediment can bury the lower heating element and shorten its life. The trapped water under the sediment can also boil in small pockets, which causes the popping and rumbling sounds many homeowners notice.

    Most manufacturers recommend flushing a tank water heater at least once a year. If you have hard water, every six months is better. Regular flushing helps the heater run efficiently, keeps it quieter, and can help it reach the full lifespan you paid for.

    Signs your water heater needs flushing

    • Popping, crackling or rumbling noises when the heater is running.
    • Hot water runs out faster than it used to.
    • Water takes longer to heat after heavy use.
    • Cloudy, sandy or rusty-looking hot water.
    • Higher energy bills without a change in how you use hot water.

    If you’ve never flushed your tank and it’s more than a few years old, plan to do it soon. Just go gently with an older tank: the drain valve may be stiff, and heavy sediment can clog it.

    What you’ll need

    • A garden hose long enough to reach a floor drain, a utility sink or outside
    • A flat screwdriver or pliers (for some drain valves)
    • Work gloves and safety glasses
    • A bucket and towels
    • About 60 to 90 minutes

    How to flush a tank water heater: step by step

    Step 1: Turn off the energy source

    For an electric water heater, switch off its breaker at the electrical panel. This is critical: heating elements that switch on in an empty tank can burn out within seconds. For a gas water heater, turn the gas control knob to “Pilot” or “Vacation” so the burner won’t fire while you drain the tank.

    Step 2: Let the water cool (recommended)

    The water in your tank can be hot enough to scald. If possible, wait a few hours or flush first thing in the morning before using hot water, so the water has cooled down. If you can’t wait, handle the hose carefully and point it somewhere safe.

    Step 3: Shut off the cold water supply

    Find the cold water inlet pipe on top of the heater and close its shut-off valve. A lever valve turns a quarter turn so it’s perpendicular to the pipe; a round handle turns clockwise until it stops.

    Step 4: Connect a hose to the drain valve

    The drain valve sits near the bottom of the tank and looks like a small spigot. Screw on a garden hose and run the other end to a floor drain, a utility sink or outdoors, below the level of the valve if possible so gravity helps.

    Hand opening the drain valve at the bottom of a water heater

    Step 5: Open a hot water faucet

    Open the hot water side of a faucet somewhere in the house, ideally on a floor above the heater. This lets air into the system so the tank drains freely instead of forming a vacuum.

    Step 6: Open the drain valve and drain the tank

    Open the drain valve slowly. Some turn with a handle; others need a flat screwdriver. Water will start flowing through the hose. It may come out cloudy or with bits of sediment. Let the tank drain completely, which usually takes 20 to 40 minutes depending on the tank size and the water pressure.

    Step 7: Stir up the sediment

    Once the tank is nearly empty, open the cold water supply valve for a few seconds, then close it. This sends a burst of water into the tank that stirs up sediment from the bottom so it can drain out. Repeat a few times until the water coming out of the hose runs clear.

    Step 8: Close the drain valve and refill

    Close the drain valve, disconnect the hose, and open the cold water supply fully. Leave the hot water faucet you opened earlier running. At first it will sputter as air escapes. When it flows steadily with no spitting, the tank is full. Close the faucet.

    Step 9: Restore power or gas

    Only after the tank is completely full, turn the breaker back on for an electric heater, or return the gas control knob to its normal setting. If your gas heater has a standing pilot that went out, relight it by following the instructions printed on the tank’s label. Give the heater an hour or so to bring the water back up to temperature.

    Step 10: Check for leaks

    Look at the drain valve and the connections at the top of the tank for drips. If the drain valve keeps dripping after closing, a hose cap screwed onto it can stop a slow drip until you can replace the valve.

    Safety note: Never restore power to an electric water heater with an empty or partially filled tank. And if you smell gas at any point, leave the house immediately and call your gas utility from outside.

    While you’re at it: 3 quick checks

    Test the temperature and pressure relief valve

    The T&P relief valve is a safety device near the top of the tank with a discharge pipe running down the side. Place a bucket under the pipe and lift the lever briefly. Water should rush out and stop when you release it. If nothing comes out, or it keeps dripping afterward, the valve needs replacing. This is an important safety part, so have it replaced promptly.

    Check the temperature setting

    The U.S. Department of Energy suggests setting your water heater to 120°F (49°C) for most households. It’s hot enough for everyday needs, reduces the risk of scalding, and saves energy compared with higher settings.

    Plan an anode rod inspection

    The anode rod is a metal rod inside the tank that corrodes on purpose so the tank lining doesn’t. Many plumbers suggest checking it every few years, and more often if you have softened water. If it’s worn down to the core wire, replacing it can extend the tank’s life. This job requires a large socket and some muscle, and some tanks have limited overhead clearance, so many homeowners leave it to a plumber.

    How to descale a tankless water heater

    Tankless heaters don’t collect sediment the same way, but minerals form scale inside the heat exchanger. Most manufacturers recommend descaling once a year, or more often with hard water. The typical process uses the service valves on the unit, a small submersible pump, a bucket and white vinegar or a descaling solution circulated through the heater for about an hour. Follow your manufacturer’s manual exactly, since steps vary by model.

    Water heater flushing at a glance

    TaskHow oftenDIY difficulty
    Flush tank water heaterOnce a year (every 6 months with hard water)Easy to moderate
    Test T&P relief valveOnce a yearEasy
    Check temperature settingOnce a yearEasy
    Inspect anode rodEvery few yearsModerate to hard
    Descale tankless heaterOnce a yearModerate

    When to call a plumber

    • Water is leaking from the tank body itself, not a fitting. That usually means the tank has failed.
    • The drain valve is clogged with sediment and won’t drain, or it breaks.
    • The T&P valve doesn’t work or discharges often.
    • You have no hot water after the flush and the pilot or elements won’t work.
    • You smell gas or see scorch marks around a gas burner.

    Frequently asked questions

    How often should I flush my water heater?

    Once a year for most homes. If you have hard water or notice sediment noises, every six months is a good idea.

    Can flushing an old water heater cause a leak?

    Occasionally. On a very old tank that has never been flushed, sediment can be the only thing sealing a weak spot, and plastic drain valves can crack. If your tank is near the end of its life, consider having a plumber inspect it first.

    What if the water won’t drain?

    Sediment may be blocking the drain valve. Close the valve, turn the cold supply on briefly to push the clog loose, and try again. If it still won’t drain, call a plumber rather than forcing the valve.

    Do I need to flush a new water heater?

    Start annual flushing after the first year. It’s much easier to keep a tank clean than to clean one that has years of buildup.

    How long does a water heater last?

    A traditional tank water heater typically lasts about 8 to 12 years. Annual flushing and anode rod checks help it reach the upper end of that range.

    The bottom line

    Flushing your water heater takes about an hour, costs nothing, and pays you back with quieter operation, faster hot water and a longer-lasting tank. Mark a date on your calendar, follow the steps above, and never forget the golden rule: the tank must be full before the power or gas goes back on.

  • How to Unclog a Drain Without Chemicals: 7 Methods That Work

    How to Unclog a Drain Without Chemicals: 7 Methods That Work

    A slow drain rarely becomes a full clog overnight. Hair, soap scum, grease and food scraps build up a little at a time until one morning the shower turns into a bathtub or the kitchen sink just sits there full of gray water. The first instinct for many people is to grab a bottle of chemical drain cleaner. In most cases, there’s a better, cheaper and safer way.

    This guide covers seven proven methods to unclog a drain without harsh chemicals, starting with the easiest and working up to the tools plumbers use. You’ll also learn which method fits which drain, how to keep clogs from coming back, and the warning signs that point to a bigger problem in your main sewer line.

    Quick answer: For bathroom sinks and showers, remove the stopper and pull out the hair, then use a plastic drain snake. For kitchen sinks, try hot water and a plunger, then clean the P-trap. If none of that works, a hand auger reaches clogs deeper in the pipe. Skip chemical cleaners: they can damage pipes and rarely clear hair clogs completely.

    Why skip chemical drain cleaners?

    Chemical drain openers work by generating heat or dissolving organic material with strong lye or acid. They sometimes work on light buildup, but they come with real downsides:

    • They can harm pipes. The heat and caustic ingredients can be hard on older metal pipes and on some plastic fittings, especially with repeated use.
    • They often don’t finish the job. A dense hair clog may get a hole punched through it and drain slowly again within weeks.
    • They make other fixes dangerous. If the chemical doesn’t work, you’re left with a sink full of caustic water. Plunging or opening the trap can splash it onto your skin or eyes.
    • Mixing is risky. Combining different drain products, or a drain product with bleach or ammonia, can release dangerous fumes.

    Mechanical methods, removing the clog physically, are almost always more effective and kinder to your plumbing.

    Before you start

    Gather a few basics: rubber gloves, a bucket, old towels, a flashlight, a flat screwdriver or pliers, and a cup plunger. Clear out the cabinet under the sink so you have room to work. If you have already poured a chemical cleaner down the drain, flush it with plenty of water if the drain allows, wear eye protection, and avoid plunging until the chemical has been diluted and cleared.

    7 ways to unclog a drain without chemicals

    1. Pull out the stopper and clean it

    In bathroom sinks and tubs, the stopper is the number one hair trap. Many sink stoppers lift straight out or twist off. Others are connected to a pivot rod behind the drain pipe under the sink: unscrew the nut on the back of the pipe, pull the rod out, and the stopper lifts free. Tub stoppers usually unscrew or have a small set screw. Clean off the hair and gunk, rinse it, and reinstall. You’ll be surprised how often this alone fixes a slow drain.

    2. Use a plastic drain snake

    Inexpensive barbed plastic strips, often sold as drain sticks or zip tools, are the best tool for hair clogs in sinks and showers. Push the strip down the drain, wiggle it, and pull it out slowly. The barbs grab hair and bring it up in one disgusting but satisfying clump. Repeat until it comes out clean, then run hot water for a minute.

    3. Flush with hot water

    For greasy or soapy buildup, hot water can help loosen things up. Run the hottest tap water you have for a few minutes, or pour a kettle of very hot water down metal pipes in stages. Avoid pouring boiling water into a porcelain toilet bowl, and be cautious with plastic PVC pipes, where very hot water is safer than a full rolling boil. Hot water alone won’t clear a solid clog, but it’s a good first step for kitchen sinks.

    4. Plunge it properly

    A plunger works by pushing and pulling a column of water against the clog. For it to work:

    • Use a flat cup plunger for sinks and tubs, and a flange plunger for toilets.
    • Fill the sink or tub with enough water to cover the plunger cup.
    • Block any overflow opening with a wet rag, and on a double kitchen sink, plug the other drain. Otherwise the pressure escapes through the open path.
    • Press down gently to push out the air, then plunge with firm, quick strokes 15 to 20 times before pulling up.

    Hands in gloves removing a P-trap under a bathroom sink into a bucket

    5. Clean the P-trap

    The U-shaped pipe under your sink, called the P-trap, holds a little water to block sewer gas. It also catches things: rings, grease, food and hair. Cleaning it is easier than it looks.

    1. Place a bucket under the trap and lay down a towel.
    2. Loosen the two slip nuts on either side of the curved section. Plastic traps usually loosen by hand; metal ones may need slip-joint pliers.
    3. Remove the trap, dump the water and debris into the bucket, and clean it out with a brush.
    4. Check the pipe going into the wall for buildup while it’s open.
    5. Reinstall the trap, making sure the washers sit correctly, and hand-tighten the nuts. Run water and check for drips.

    6. Try baking soda and vinegar (for light buildup)

    This popular combination creates fizzing that can help loosen light buildup and freshen a drain. Pour about half a cup of baking soda down the drain, follow with a cup of white vinegar, cover the drain for 15 to 30 minutes, then flush with hot water. Be realistic: it’s a good maintenance trick, but it won’t dissolve a solid hair clog or a toy stuck in the trap. If the drain is completely blocked, use a mechanical method instead.

    7. Use a hand auger

    When the clog is past the trap, a hand-crank drain auger, usually 15 to 25 feet long, can reach it. Remove the stopper or the trap to feed the cable in more directly. Push the cable in until you feel resistance, tighten the lock, and crank while pushing gently forward. You’ll feel the cable either break through or grab the clog. Pull it back slowly, clean the cable, and flush with hot water. Wear gloves and wipe the cable as it comes out.

    Safety note: Use only a closet auger (toilet auger) on toilets. A regular drain snake can scratch the porcelain bowl. Never use an auger in a drain where chemical cleaner is still sitting.

    Which method works best for each drain?

    DrainMost common causeBest first tryNext step
    Bathroom sinkHair and soapClean stopper, plastic snakeClean P-trap
    Shower or tubHairRemove strainer, plastic snakePlunger, hand auger
    Kitchen sinkGrease and foodHot water, plungerClean P-trap, hand auger
    ToiletToo much paper, objectsFlange plungerCloset auger
    Floor drainDebris, sedimentRemove grate and cleanAuger or a plumber

    How to prevent clogs from coming back

    • Use hair catchers in showers and tubs. Clean them weekly.
    • Never pour grease down the sink. Let it cool in a can or jar and throw it in the trash. Wipe greasy pans with a paper towel before washing.
    • Scrape plates into the trash, not the sink, even if you have a garbage disposal.
    • Run hot water for 30 seconds after using the kitchen sink.
    • Clean stoppers monthly in bathroom sinks.
    • Consider an enzyme drain maintenance product for regular use. They work slowly and are designed for upkeep, not emergencies.
    • Only flush toilet paper. “Flushable” wipes are a common cause of toilet and sewer clogs.

    When it’s time to call a plumber

    Some clogs aren’t in the drain you’re looking at. Call a licensed plumber if you notice any of these:

    • Several drains are slow or clogged at the same time.
    • Water backs up into the tub or shower when you flush the toilet or run the washing machine.
    • You hear gurgling from drains or toilets.
    • There’s a sewage smell in the house or yard.
    • The same drain clogs again and again despite cleaning.

    These signs usually point to a clog or problem in the main sewer line, which needs professional equipment such as a motorized auger or a camera inspection.

    Frequently asked questions

    Does baking soda and vinegar really unclog drains?

    It can help with light buildup and odors, but it won’t clear a solid clog. Think of it as maintenance, not a fix for a fully blocked drain.

    Can I use a plunger after using drain cleaner?

    It’s not recommended. Plunging can splash caustic chemicals onto your skin and eyes. Flush the drain well first, or call a plumber and tell them what product you used.

    Why does my shower drain clog so often?

    Hair combines with soap residue to form tough mats right below the drain opening. A hair catcher and a monthly clean with a plastic snake usually solve the problem.

    Is it safe to pour boiling water down the drain?

    Very hot water is fine for most metal pipes. Avoid pouring boiling water into toilets, which can crack porcelain, and be cautious with plastic pipes.

    How much does a plumber charge to unclog a drain?

    Prices vary widely by location and how deep the clog is. A simple sink clog usually costs far less than a main sewer line cleaning, which may need specialized equipment.

    The bottom line

    Most clogs are close to the drain opening and come out with a stopper cleaning, a plastic snake or a quick P-trap cleaning. Start simple, work your way up to a hand auger, and leave chemical cleaners on the shelf. Then use hair catchers and keep grease out of the sink, and you’ll spend a lot less time standing in a puddle in the shower.

  • Toilet Keeps Running? How to Fix It in 15 Minutes

    Toilet Keeps Running? How to Fix It in 15 Minutes

    A toilet that keeps running is one of the most common household annoyances, and one of the most wasteful. That gentle hiss or the tank that refills on its own every few minutes can quietly send hundreds of gallons of water down the drain. According to the EPA’s WaterSense program, a leaky toilet can waste about 200 gallons of water every day.

    The good news: you almost never need a plumber. A running toilet is usually caused by one of three inexpensive parts inside the tank, and you can diagnose and fix most problems in 15 to 30 minutes with no special tools. This guide walks you through exactly how a toilet works, how to find the cause, and how to fix each one.

    Quick answer: Lift the tank lid and check three things. If the chain is tangled or too tight, adjust it. If water is leaking past the rubber flapper, clean or replace it. If water is spilling into the overflow tube, lower the float. Those three fixes solve the vast majority of running toilets.

    How a toilet tank works

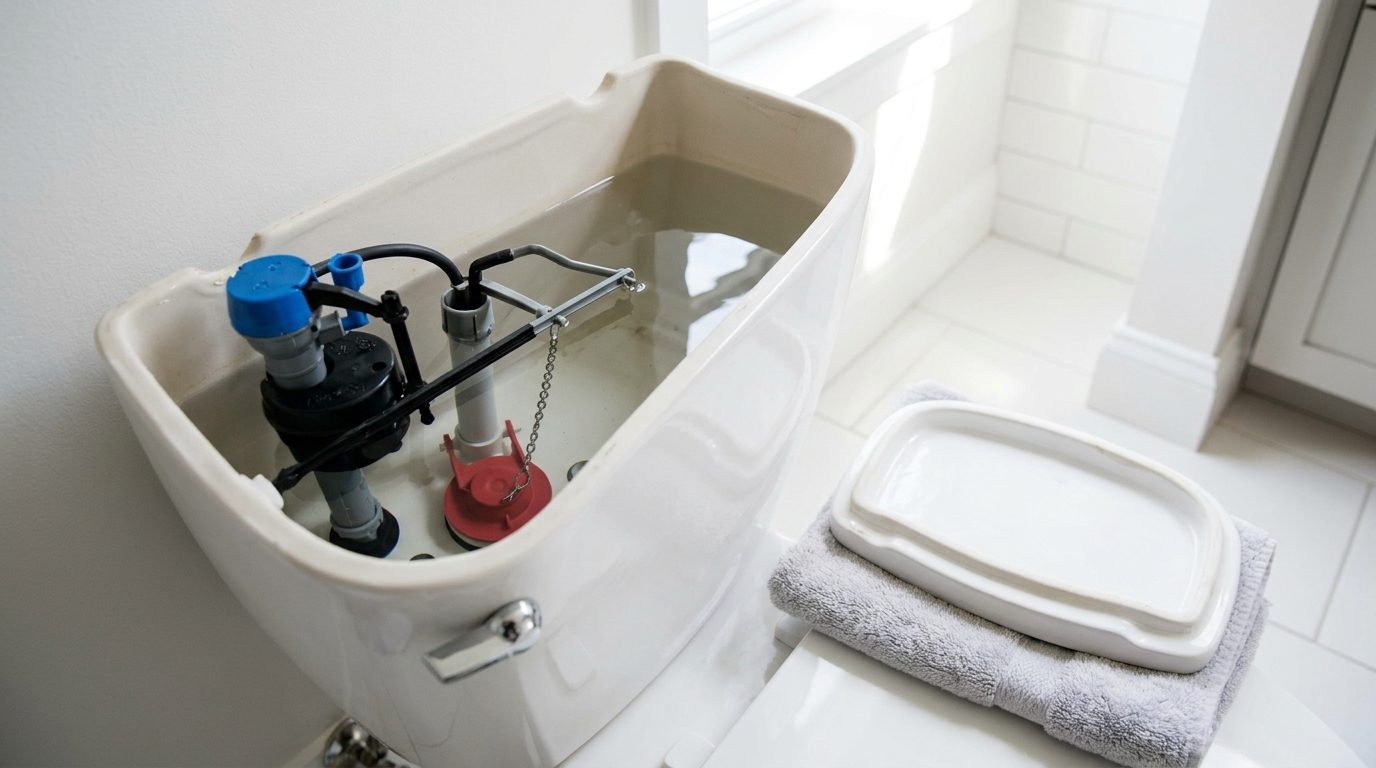
    Understanding the parts makes the repair much easier. When you take the lid off a standard gravity-flush toilet, you’ll see:

    • Handle and lift chain: pressing the handle pulls a chain that lifts the flapper.
    • Flapper: a rubber seal at the bottom of the tank that covers the flush valve opening. When it lifts, water rushes into the bowl.
    • Flush valve and overflow tube: the opening the flapper seals, plus a vertical tube that sends excess water into the bowl so the tank can’t overflow.
    • Fill valve: the tall assembly on the left side that refills the tank after each flush.
    • Float: a cup or ball that rises with the water and tells the fill valve when to shut off.
    • Refill tube: a small hose that sends a little water down the overflow tube to refill the bowl.

    A toilet “runs” when one of two things happens: water leaks out of the tank into the bowl, so the fill valve keeps topping it up, or the fill valve never shuts off and water keeps spilling into the overflow tube.

    Step 1: Figure out why your toilet is running

    Take the lid off and set it somewhere safe on a towel, since tank lids are heavy and crack easily. Then run these quick checks.

    Check the water level

    Look at the top of the overflow tube. If water is flowing into it, the fill valve is letting the tank overfill. Most tanks have a fill line marked on the inside wall. If not, the water should sit about an inch below the top of the overflow tube.

    Do the food coloring test

    If the water level looks fine, the flapper may be leaking. Add 10 drops of food coloring to the tank and wait 15 to 20 minutes without flushing. If color appears in the bowl, water is seeping past the flapper. Flush afterward so the dye doesn’t stain.

    Watch and listen

    Flush and watch what happens. Does the flapper drop and seal cleanly? Does the chain catch on anything? Does the handle stay down? A toilet that refills by itself every so often, sometimes called “ghost flushing,” almost always points to a slow flapper leak.

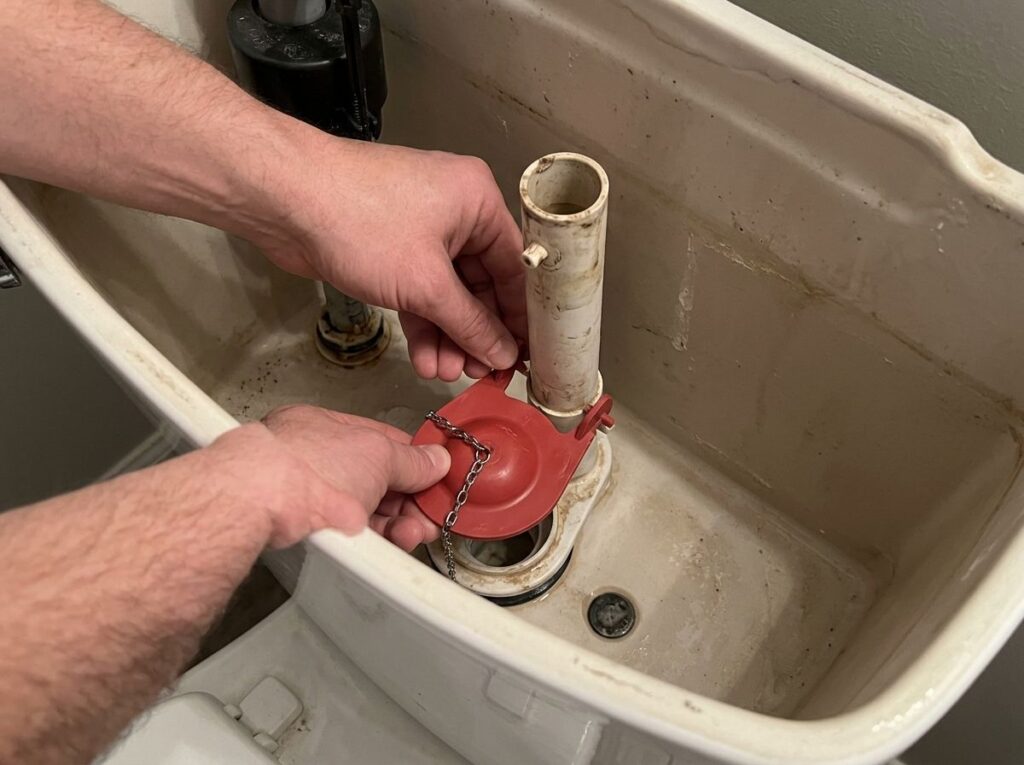
    Hands replacing a rubber flapper inside a toilet tank

    Step 2: Fix the problem

    Fix 1: Adjust the chain

    The chain between the handle arm and the flapper should have about half an inch of slack when the flapper is closed. If it’s too tight, the flapper can’t seal. If it’s too long, it can get trapped under the flapper and hold it open. Unhook the chain clip and move it to a different link until the slack is right. Flush a few times to make sure the chain doesn’t tangle.

    Fix 2: Clean or replace the flapper

    Flappers are made of rubber, and over time minerals, chlorine and age make them warp, harden or crack. First, try cleaning:

    1. Turn off the water at the shut-off valve behind the toilet and flush to empty the tank.
    2. Run your finger around the flapper and the flush valve seat it sits on. Feel for grit, mineral buildup or a rough edge.
    3. Wipe the seat with a cloth, or scrub it gently with a non-scratch pad.
    4. Turn the water back on and repeat the food coloring test.

    If it still leaks, or the flapper feels stiff, slimy or misshapen, replace it. Unhook the flapper’s ears from the pegs on the overflow tube (or slide off the ring), take it to the store, and buy one that matches. Most toilets use a 2-inch flapper, while many newer high-efficiency models use a 3-inch flush valve. Matching the size and style matters more than buying the most expensive one. Installing the new flapper takes about five minutes: hook it on, attach the chain with a little slack, turn the water on and test.

    Pro tip: If your toilet manufacturer sells a branded replacement flapper, it’s often worth buying. Some toilets are designed around a specific flapper shape, and a generic one may not seal as well.

    Fix 3: Lower the float

    If water is running into the overflow tube, the float is set too high, so the fill valve doesn’t shut off until it’s too late.

    • Cup-style float (a cylinder that slides up and down the fill valve): pinch the metal clip or turn the adjustment screw on top to lower it.
    • Ball float (a ball on a long arm): turn the adjustment screw where the arm meets the valve, or gently bend the arm downward.

    Lower it a little at a time and flush between adjustments until the water stops about an inch below the top of the overflow tube.

    Fix 4: Check the refill tube

    The small refill tube should be clipped to the top of the overflow tube, aimed into it, but not pushed down inside it. If the tube is jammed too far into the overflow, it can siphon water out of the tank continuously, which keeps the fill valve running. Clip it so the end sits just above the water line.

    Fix 5: Replace the fill valve

    If the water level is right but the fill valve hisses, refills slowly, or won’t shut off even after adjusting the float, the valve is worn out. Fill valves are inexpensive and universal kits fit most toilets.

    1. Turn off the water supply and flush. Sponge out the remaining water in the tank.
    2. Put a small towel under the supply line connection and unscrew the supply line from the bottom of the tank.
    3. Unscrew the plastic locknut under the tank and lift the old fill valve out.
    4. Adjust the new valve’s height according to its instructions, insert it, and hand-tighten the locknut plus a quarter turn. Don’t overtighten plastic parts.
    5. Reconnect the supply line, attach the refill tube to the overflow tube, turn on the water and set the float height.
    6. Check for leaks under the tank after a few flushes.

    Fix 6: Free a sticking handle

    If the handle stays down after you flush, the flapper may stay open. Tighten the nut that holds the handle inside the tank. Note that it’s usually reverse-threaded, so you turn it clockwise to loosen and counterclockwise to tighten. If the handle is corroded, a replacement costs very little.

    What it costs and how long it takes

    RepairDifficultyTimeTypical parts cost
    Adjust chainVery easy2 minutesFree
    Clean flapper and seatEasy10 minutesFree
    Replace flapperEasy10 to 15 minutesUsually under $20
    Adjust floatEasy5 minutesFree
    Replace fill valveModerate30 to 45 minutesUsually $10 to $30
    Replace flush valveHarder (tank removal)1 to 2 hoursVaries

    When the flush valve itself is the problem

    If you’ve replaced the flapper and it still leaks, inspect the flush valve seat closely. A cracked or badly pitted seat can’t seal no matter how good the flapper is. Some repair kits include a seal that glues over a damaged seat. Otherwise, replacing the flush valve means draining the tank, removing it from the bowl and replacing the tank-to-bowl gasket as well. It’s doable for a confident DIYer, but this is the point where many homeowners call a plumber.

    Safety note: Always turn off the water supply before removing parts, and never use harsh chemical tank tablets. Many plumbers and manufacturers warn that bleach and chlorine tablets can break down rubber flappers and seals faster, which leads to more leaks.

    When to call a plumber

    • The tank or bowl is cracked.
    • Water leaks around the base of the toilet onto the floor.
    • The shut-off valve behind the toilet is stuck, corroded or leaking.
    • You’ve replaced the flapper and fill valve and the toilet still runs.
    • Water is leaking from the bolts or gasket between the tank and bowl.

    Frequently asked questions

    Why does my toilet run every few minutes on its own?

    That’s ghost flushing, and it’s almost always caused by water slowly leaking past the flapper. As the tank level drops, the fill valve switches on to refill it. Clean or replace the flapper.

    Can a running toilet really raise my water bill?

    Yes. A steady leak runs 24 hours a day, so even a quiet one can add a noticeable amount to your monthly bill. It’s one of the fastest home repairs to pay for itself.

    Do universal flappers work?

    Often, yes, as long as you match the size (2-inch or 3-inch) and style. If a universal flapper doesn’t seal, try the manufacturer’s branded replacement.

    Is it safe to leave a running toilet overnight?

    It’s not dangerous in most cases because the overflow tube prevents the tank from flooding, but you’ll waste water. Close the shut-off valve behind the toilet until you can fix it, and only open it to flush.

    How long does a toilet flapper last?

    Many flappers last several years, but hard water and cleaning chemicals can shorten that. If yours is stiff, warped or slimy, replace it.

    The bottom line

    A running toilet looks like a plumbing problem, but it’s really a small mechanical one. Start with the simplest checks: the chain, the flapper and the water level. Most of the time, one of those is the culprit, and the fix costs little or nothing. Keep a spare flapper on hand once you know the size, and you’ll be able to silence the next running toilet in minutes.

  • How to Prevent Frozen Pipes (and What to Do If They Freeze)

    How to Prevent Frozen Pipes (and What to Do If They Freeze)

    Every winter, frozen pipes turn a cold snap into a flooded basement for thousands of homeowners. The frustrating part is that most of that damage is preventable. A few inexpensive supplies and a handful of habits are usually enough to keep water moving, even when the temperature outside drops well below freezing.

    This guide explains why pipes freeze, which pipes in your home are most at risk, exactly what to do before a cold night, and how to safely thaw a pipe that has already frozen. It also covers what to do in the first few minutes if a pipe bursts, because acting fast can save you thousands of dollars in repairs.

    Quick answer: Keep your heat at 55°F (13°C) or higher, insulate pipes in unheated spaces, open sink cabinets on exterior walls, disconnect garden hoses, and let a faucet drip on the coldest nights. If a pipe freezes, open the faucet and warm the pipe slowly with a hair dryer or heating pad. Never use an open flame.

    Why pipes freeze and burst

    Water expands by roughly 9% when it turns to ice. When a section of pipe freezes, that ice acts like a plug. As more water freezes behind it, pressure builds up in the trapped section between the ice and the closed faucet. Surprisingly, the pipe usually does not split where the ice is. It bursts in the section where pressure has nowhere to go, which is why a leak sometimes appears several feet away from the coldest spot.

    Pipes are most at risk when the outside temperature falls to around 20°F (-6°C) or lower, especially during long cold spells, windy nights and sudden temperature drops. A single very cold night can be enough to freeze an exposed pipe, but most damage happens after several days of sustained cold, or when a home is left empty with the heat turned down too low.

    Which pipes are most at risk?

    Not every pipe in your home is equally vulnerable. Pipes inside heated living space rarely freeze. The trouble spots are the places where cold air reaches the plumbing:

    • Outdoor hose bibs and sprinkler lines, which sit directly in the cold.
    • Pipes in unheated areas such as crawl spaces, attics, garages and unfinished basements.
    • Pipes on exterior walls, especially under kitchen and bathroom sinks.
    • Pipes near drafts, like those beside dryer vents, cable holes or poorly sealed rim joists.
    • Supply lines in cabinets where the doors stay closed and warm room air can’t circulate.

    Take ten minutes before winter to walk through your home with a flashlight and note where these pipes are. Knowing your weak spots makes everything else in this guide faster.

    How to prevent frozen pipes: 10 steps that work

    1. Keep the heat on, even when you’re away

    Set your thermostat no lower than 55°F (13°C), day and night, including when you travel. Turning the heat way down to save money can backfire quickly: the cost of one burst pipe dwarfs a few days of heating bills. If you have a smart thermostat, set a minimum temperature alert so you get a notification if your home starts getting too cold.

    2. Insulate exposed pipes

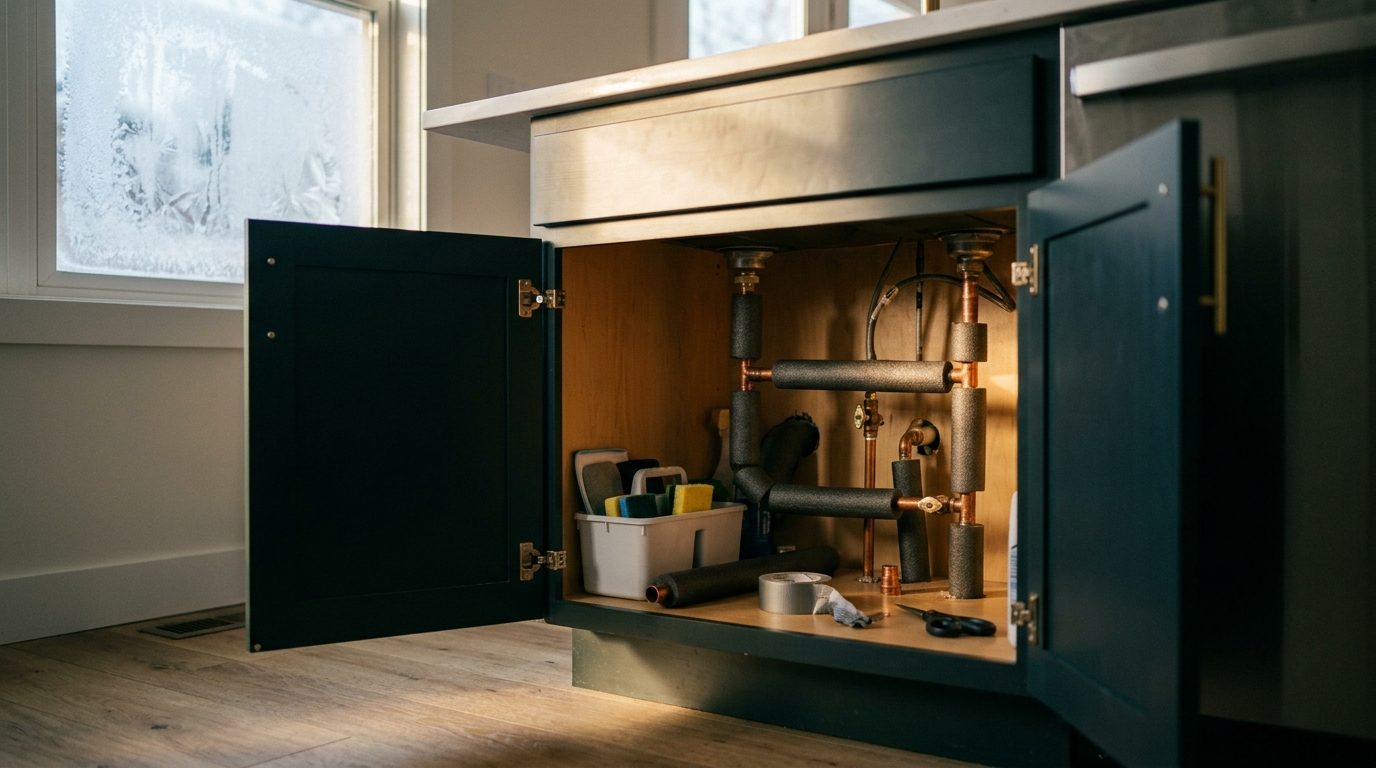
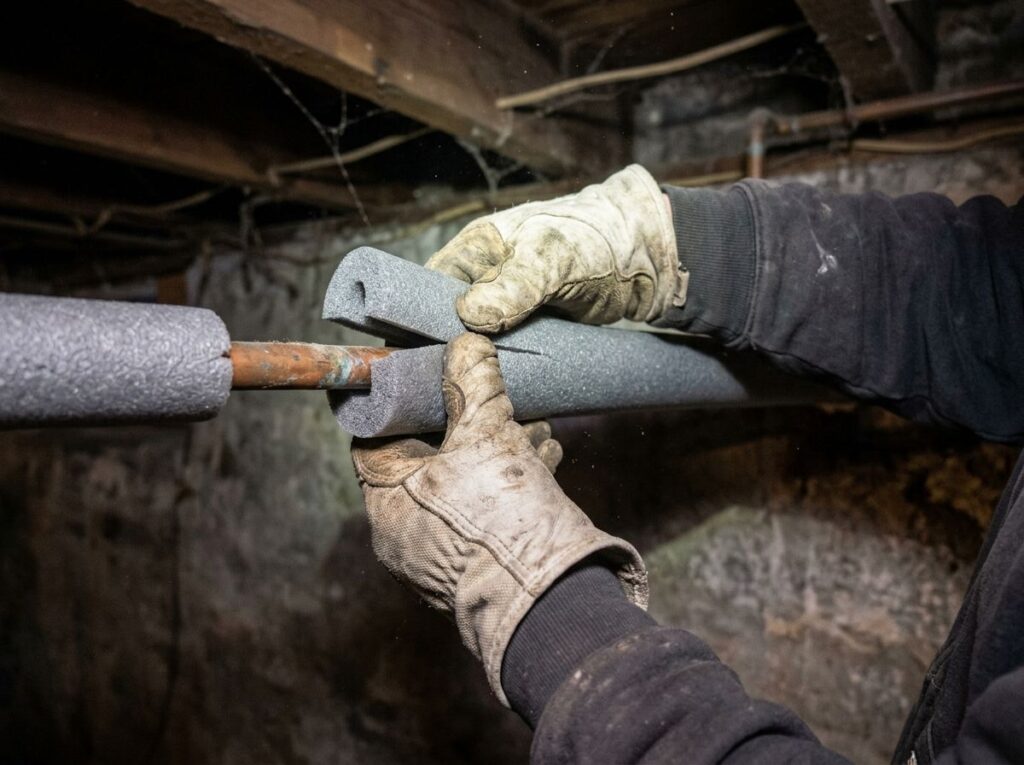
    Foam pipe insulation sleeves are cheap, sold in 6-foot lengths at every hardware store, and take minutes to install. Measure the pipe’s diameter, buy the matching size, slip it over the pipe and seal the seam with the built-in adhesive strip or duct tape. Focus on pipes in crawl spaces, attics, garages and along exterior walls. Insulation slows heat loss; it doesn’t generate heat, so it works best combined with the other steps below.

    Hands in work gloves wrapping foam insulation around a copper pipe in a basement

    3. Use heat cable for the worst spots

    For pipes that freeze year after year, a heat cable (also called heat tape) adds active protection. Look for a UL-listed cable with a built-in thermostat that switches on automatically near freezing. Follow the manufacturer’s instructions exactly: some cables must not overlap themselves, some are not rated for plastic pipe, and most should not be covered by insulation unless the instructions say so. Plug it into a GFCI-protected outlet and inspect it every fall for cracks or damage.

    4. Seal air leaks near plumbing

    A small gap can blast freezing air directly onto a pipe. Check where pipes and wires enter your home, around the rim joist in the basement, and near dryer vents. Seal small gaps with caulk and larger ones with expanding spray foam. This step also lowers your heating bill, so it pays for itself twice.

    5. Open cabinet doors on cold nights

    Kitchen and bathroom sinks on exterior walls are classic freeze points. When temperatures drop into the low 20s or below, open those cabinet doors so warm room air can reach the pipes. Move cleaning products out of reach if you have children or pets.

    6. Let faucets drip during extreme cold

    A slow drip from a faucet served by vulnerable pipes keeps water moving and relieves pressure in the line. If the faucet has separate hot and cold handles, open both slightly. A thin, steady stream is enough. It uses a little water, but far less than you would lose to a burst pipe.

    7. Disconnect hoses and shut off outdoor faucets

    Before the first hard freeze, disconnect, drain and store garden hoses. A connected hose traps water in the faucet, and that’s one of the most common ways outdoor spigots split. If your home has an indoor shut-off valve for the outside faucet, close it, then open the outdoor faucet to let the remaining water drain. Frost-free sillcocks help, but only if the hose is disconnected.

    8. Blow out sprinkler and pool lines

    Irrigation systems hold water underground and in valve boxes. Follow your system’s winterizing instructions or hire a lawn care company to blow out the lines with compressed air before the ground freezes.

    9. Keep the garage door closed

    Many homes have water lines running through the garage, sometimes to a laundry area or a water heater. A garage door left open on a frigid night can freeze them fast. Keep it shut during cold weather.

    10. Prepare before you travel

    If you’ll be away for more than a few days in winter, keep the heat at 55°F or higher, ask someone to check the house daily, and consider shutting off the main water valve and opening faucets to drain the lines. A Wi-Fi water leak detector and temperature sensor placed near vulnerable pipes can alert your phone before a small problem becomes a flood.

    Signs a pipe is already frozen

    Catching a frozen pipe early, before it bursts, is the best outcome. Watch for these warning signs on cold mornings:

    • You turn on a faucet and only a trickle comes out, or nothing at all.
    • You can see frost on an exposed pipe.
    • A section of pipe looks bulged or slightly swollen.
    • The toilet tank doesn’t refill after a flush.
    • You notice an unusual smell from a drain, which can happen when the line is blocked.

    How to thaw a frozen pipe safely

    If you suspect a frozen pipe, act right away. The goal is to warm the pipe gradually and let melting water flow out.

    1. Open the faucet. Turn on the faucet the pipe feeds, both hot and cold. Running water helps melt the ice, and an open faucet relieves pressure.
    2. Find the frozen section. Start near the faucet and work back along the pipe. Frozen sections are usually in the coldest part of the run: an exterior wall, a crawl space or near a draft.
    3. Apply gentle heat. Use a hair dryer, a heating pad, a portable space heater kept well away from flammable materials, or towels soaked in hot water. Work from the faucet end back toward the blockage so melted water has somewhere to go.
    4. Keep going until full pressure returns. Once water flows normally, check the entire length of the pipe for leaks or cracks.
    5. Check other faucets. If one pipe froze, others may be close to freezing too.

    Safety note: Never use a propane torch, kerosene heater, charcoal grill or any open flame to thaw a pipe. Open flames can start fires inside walls and can overheat the pipe, and fuel-burning heaters can produce dangerous carbon monoxide indoors. If the frozen section is inside a wall or you can’t reach it, call a licensed plumber.

    What to do if a pipe bursts

    A burst pipe can release hundreds of gallons of water in a short time. Move quickly and stay calm:

    1. Shut off the main water valve. It’s usually where the water line enters your home, often in the basement, crawl space, garage or near the water heater. Everyone in your household should know where it is.
    2. Turn off the water heater. Switch an electric heater off at the breaker, or set a gas heater to its pilot or “vacation” setting.
    3. Cut power to wet areas. If water is near outlets, appliances or the electrical panel, turn off power at the breaker only if you can do it while standing on a dry surface. Otherwise, call your utility.
    4. Open faucets to drain the remaining water from the lines.
    5. Remove water fast. Mop, use a wet/dry vacuum and start fans or a dehumidifier. Mold can begin growing on wet materials within 24 to 48 hours.
    6. Document everything. Take photos and video of the damage before you clean up, and call your insurance company.
    7. Call a licensed plumber to repair the pipe and check the rest of the system.

    Pipe freeze prevention at a glance

    TaskWhen to do itTypical cost
    Foam pipe insulationBefore winterA few dollars per 6-foot section
    Seal gaps near pipesBefore winterUnder $20 for caulk and spray foam
    Disconnect and drain hosesBefore the first hard freezeFree
    Thermostat at 55°F or higherAll winter, including when awaySmall heating cost
    Open cabinets and drip faucetsNights near 20°F or colderPennies of water
    Heat cable on problem pipesInstall in fall, check yearlyVaries by length

    Frequently asked questions

    At what temperature do pipes freeze?

    Water freezes at 32°F (0°C), but pipes inside a home are usually protected by surrounding heat. The real danger zone is when outside temperatures drop to about 20°F (-6°C) or lower, especially for pipes in unheated spaces or on exterior walls.

    Should I drip hot or cold water?

    Drip both if your faucet has separate handles. That keeps water moving through both supply lines. A slow, steady drip is enough.

    Can PEX pipes freeze?

    Yes. PEX is more flexible than copper and handles expansion better, but it can still freeze, and the fittings and connections can fail. Insulate PEX the same way you would any other pipe.

    Does homeowners insurance cover frozen pipes?

    Many policies cover sudden water damage from a burst pipe, but coverage can be denied if the home wasn’t reasonably heated or maintained. Read your policy and talk to your agent before winter.

    How long does it take for pipes to freeze?

    It depends on the temperature, wind and how exposed the pipe is. An uninsulated pipe in a cold crawl space can freeze within a few hours on a very cold night, which is why preparing before the cold arrives matters.

    The bottom line

    Preventing frozen pipes comes down to three things: keep heat around your plumbing, keep cold air away from it, and keep water moving on the coldest nights. Spend an afternoon this fall insulating exposed pipes, sealing drafts and disconnecting your hoses, and you’ll head into winter with far less to worry about. And if a pipe does freeze, thaw it slowly, never with a flame, and know exactly where your main shut-off valve is before you need it.