A toilet that keeps running is one of the most common household annoyances, and one of the most wasteful. That gentle hiss or the tank that refills on its own every few minutes can quietly send hundreds of gallons of water down the drain. According to the EPA’s WaterSense program, a leaky toilet can waste about 200 gallons of water every day.
The good news: you almost never need a plumber. A running toilet is usually caused by one of three inexpensive parts inside the tank, and you can diagnose and fix most problems in 15 to 30 minutes with no special tools. This guide walks you through exactly how a toilet works, how to find the cause, and how to fix each one.
Quick answer: Lift the tank lid and check three things. If the chain is tangled or too tight, adjust it. If water is leaking past the rubber flapper, clean or replace it. If water is spilling into the overflow tube, lower the float. Those three fixes solve the vast majority of running toilets.
How a toilet tank works
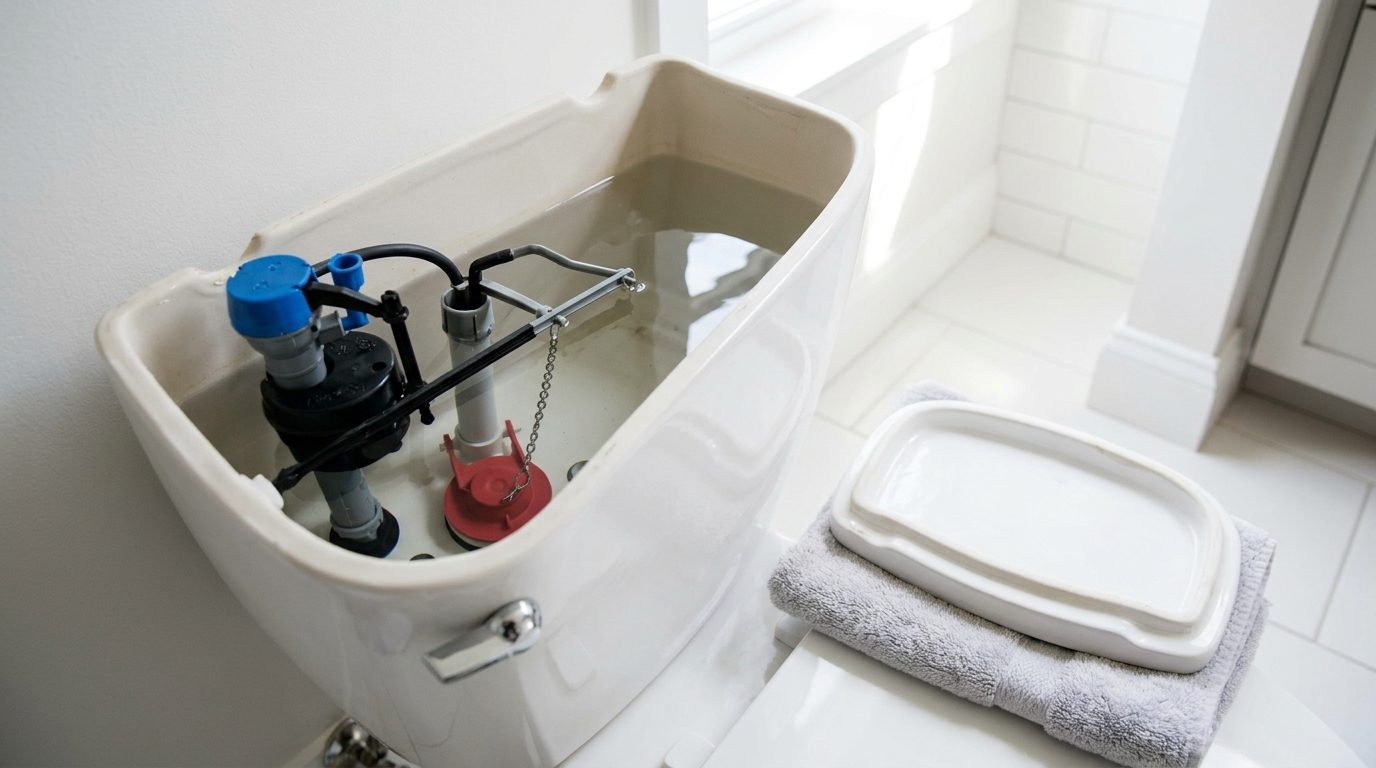
Understanding the parts makes the repair much easier. When you take the lid off a standard gravity-flush toilet, you’ll see:
- Handle and lift chain: pressing the handle pulls a chain that lifts the flapper.
- Flapper: a rubber seal at the bottom of the tank that covers the flush valve opening. When it lifts, water rushes into the bowl.
- Flush valve and overflow tube: the opening the flapper seals, plus a vertical tube that sends excess water into the bowl so the tank can’t overflow.
- Fill valve: the tall assembly on the left side that refills the tank after each flush.
- Float: a cup or ball that rises with the water and tells the fill valve when to shut off.
- Refill tube: a small hose that sends a little water down the overflow tube to refill the bowl.
A toilet “runs” when one of two things happens: water leaks out of the tank into the bowl, so the fill valve keeps topping it up, or the fill valve never shuts off and water keeps spilling into the overflow tube.
Step 1: Figure out why your toilet is running
Take the lid off and set it somewhere safe on a towel, since tank lids are heavy and crack easily. Then run these quick checks.
Check the water level
Look at the top of the overflow tube. If water is flowing into it, the fill valve is letting the tank overfill. Most tanks have a fill line marked on the inside wall. If not, the water should sit about an inch below the top of the overflow tube.
Do the food coloring test
If the water level looks fine, the flapper may be leaking. Add 10 drops of food coloring to the tank and wait 15 to 20 minutes without flushing. If color appears in the bowl, water is seeping past the flapper. Flush afterward so the dye doesn’t stain.
Watch and listen
Flush and watch what happens. Does the flapper drop and seal cleanly? Does the chain catch on anything? Does the handle stay down? A toilet that refills by itself every so often, sometimes called “ghost flushing,” almost always points to a slow flapper leak.
Step 2: Fix the problem
Fix 1: Adjust the chain
The chain between the handle arm and the flapper should have about half an inch of slack when the flapper is closed. If it’s too tight, the flapper can’t seal. If it’s too long, it can get trapped under the flapper and hold it open. Unhook the chain clip and move it to a different link until the slack is right. Flush a few times to make sure the chain doesn’t tangle.
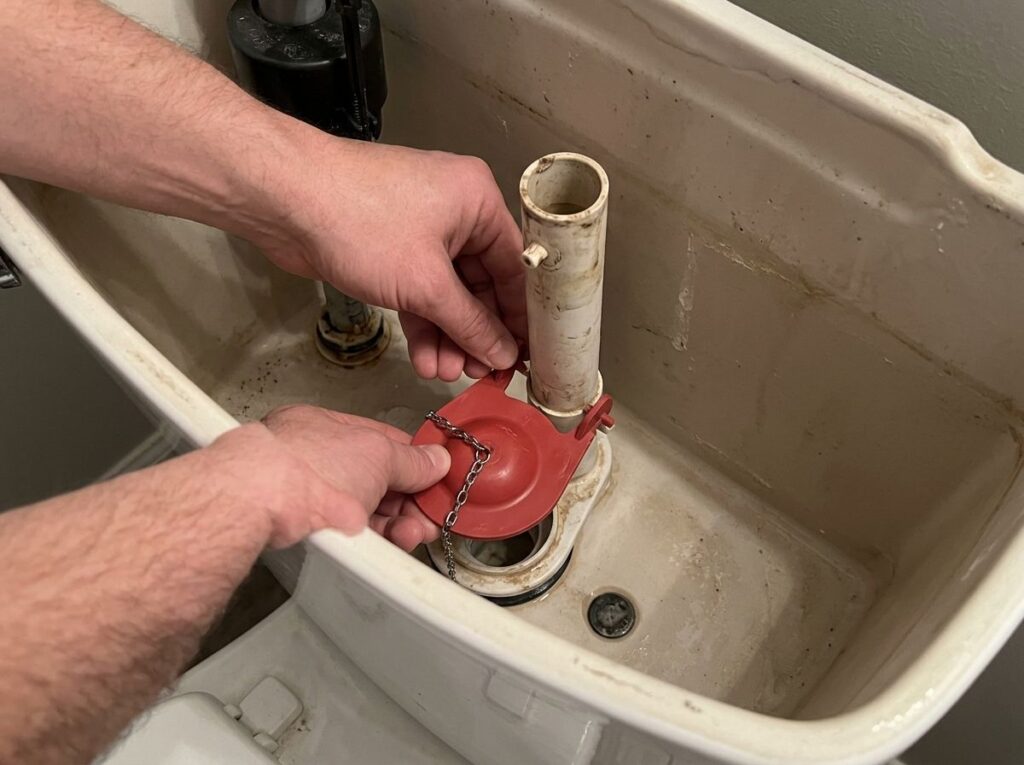
Fix 2: Clean or replace the flapper
Flappers are made of rubber, and over time minerals, chlorine and age make them warp, harden or crack. First, try cleaning:
- Turn off the water at the shut-off valve behind the toilet and flush to empty the tank.
- Run your finger around the flapper and the flush valve seat it sits on. Feel for grit, mineral buildup or a rough edge.
- Wipe the seat with a cloth, or scrub it gently with a non-scratch pad.
- Turn the water back on and repeat the food coloring test.
If it still leaks, or the flapper feels stiff, slimy or misshapen, replace it. Unhook the flapper’s ears from the pegs on the overflow tube (or slide off the ring), take it to the store, and buy one that matches. Most toilets use a 2-inch flapper, while many newer high-efficiency models use a 3-inch flush valve. Matching the size and style matters more than buying the most expensive one. Installing the new flapper takes about five minutes: hook it on, attach the chain with a little slack, turn the water on and test.
Pro tip: If your toilet manufacturer sells a branded replacement flapper, it’s often worth buying. Some toilets are designed around a specific flapper shape, and a generic one may not seal as well.
Fix 3: Lower the float
If water is running into the overflow tube, the float is set too high, so the fill valve doesn’t shut off until it’s too late.
- Cup-style float (a cylinder that slides up and down the fill valve): pinch the metal clip or turn the adjustment screw on top to lower it.
- Ball float (a ball on a long arm): turn the adjustment screw where the arm meets the valve, or gently bend the arm downward.
Lower it a little at a time and flush between adjustments until the water stops about an inch below the top of the overflow tube.
Fix 4: Check the refill tube
The small refill tube should be clipped to the top of the overflow tube, aimed into it, but not pushed down inside it. If the tube is jammed too far into the overflow, it can siphon water out of the tank continuously, which keeps the fill valve running. Clip it so the end sits just above the water line.
Fix 5: Replace the fill valve
If the water level is right but the fill valve hisses, refills slowly, or won’t shut off even after adjusting the float, the valve is worn out. Fill valves are inexpensive and universal kits fit most toilets.
- Turn off the water supply and flush. Sponge out the remaining water in the tank.
- Put a small towel under the supply line connection and unscrew the supply line from the bottom of the tank.
- Unscrew the plastic locknut under the tank and lift the old fill valve out.
- Adjust the new valve’s height according to its instructions, insert it, and hand-tighten the locknut plus a quarter turn. Don’t overtighten plastic parts.
- Reconnect the supply line, attach the refill tube to the overflow tube, turn on the water and set the float height.
- Check for leaks under the tank after a few flushes.
Fix 6: Free a sticking handle
If the handle stays down after you flush, the flapper may stay open. Tighten the nut that holds the handle inside the tank. Note that it’s usually reverse-threaded, so you turn it clockwise to loosen and counterclockwise to tighten. If the handle is corroded, a replacement costs very little.
What it costs and how long it takes
| Repair | Difficulty | Time | Typical parts cost |
|---|---|---|---|
| Adjust chain | Very easy | 2 minutes | Free |
| Clean flapper and seat | Easy | 10 minutes | Free |
| Replace flapper | Easy | 10 to 15 minutes | Usually under $20 |
| Adjust float | Easy | 5 minutes | Free |
| Replace fill valve | Moderate | 30 to 45 minutes | Usually $10 to $30 |
| Replace flush valve | Harder (tank removal) | 1 to 2 hours | Varies |
When the flush valve itself is the problem
If you’ve replaced the flapper and it still leaks, inspect the flush valve seat closely. A cracked or badly pitted seat can’t seal no matter how good the flapper is. Some repair kits include a seal that glues over a damaged seat. Otherwise, replacing the flush valve means draining the tank, removing it from the bowl and replacing the tank-to-bowl gasket as well. It’s doable for a confident DIYer, but this is the point where many homeowners call a plumber.
Safety note: Always turn off the water supply before removing parts, and never use harsh chemical tank tablets. Many plumbers and manufacturers warn that bleach and chlorine tablets can break down rubber flappers and seals faster, which leads to more leaks.
When to call a plumber
- The tank or bowl is cracked.
- Water leaks around the base of the toilet onto the floor.
- The shut-off valve behind the toilet is stuck, corroded or leaking.
- You’ve replaced the flapper and fill valve and the toilet still runs.
- Water is leaking from the bolts or gasket between the tank and bowl.
Frequently asked questions
Why does my toilet run every few minutes on its own?
That’s ghost flushing, and it’s almost always caused by water slowly leaking past the flapper. As the tank level drops, the fill valve switches on to refill it. Clean or replace the flapper.
Can a running toilet really raise my water bill?
Yes. A steady leak runs 24 hours a day, so even a quiet one can add a noticeable amount to your monthly bill. It’s one of the fastest home repairs to pay for itself.
Do universal flappers work?
Often, yes, as long as you match the size (2-inch or 3-inch) and style. If a universal flapper doesn’t seal, try the manufacturer’s branded replacement.
Is it safe to leave a running toilet overnight?
It’s not dangerous in most cases because the overflow tube prevents the tank from flooding, but you’ll waste water. Close the shut-off valve behind the toilet until you can fix it, and only open it to flush.
How long does a toilet flapper last?
Many flappers last several years, but hard water and cleaning chemicals can shorten that. If yours is stiff, warped or slimy, replace it.
The bottom line
A running toilet looks like a plumbing problem, but it’s really a small mechanical one. Start with the simplest checks: the chain, the flapper and the water level. Most of the time, one of those is the culprit, and the fix costs little or nothing. Keep a spare flapper on hand once you know the size, and you’ll be able to silence the next running toilet in minutes.