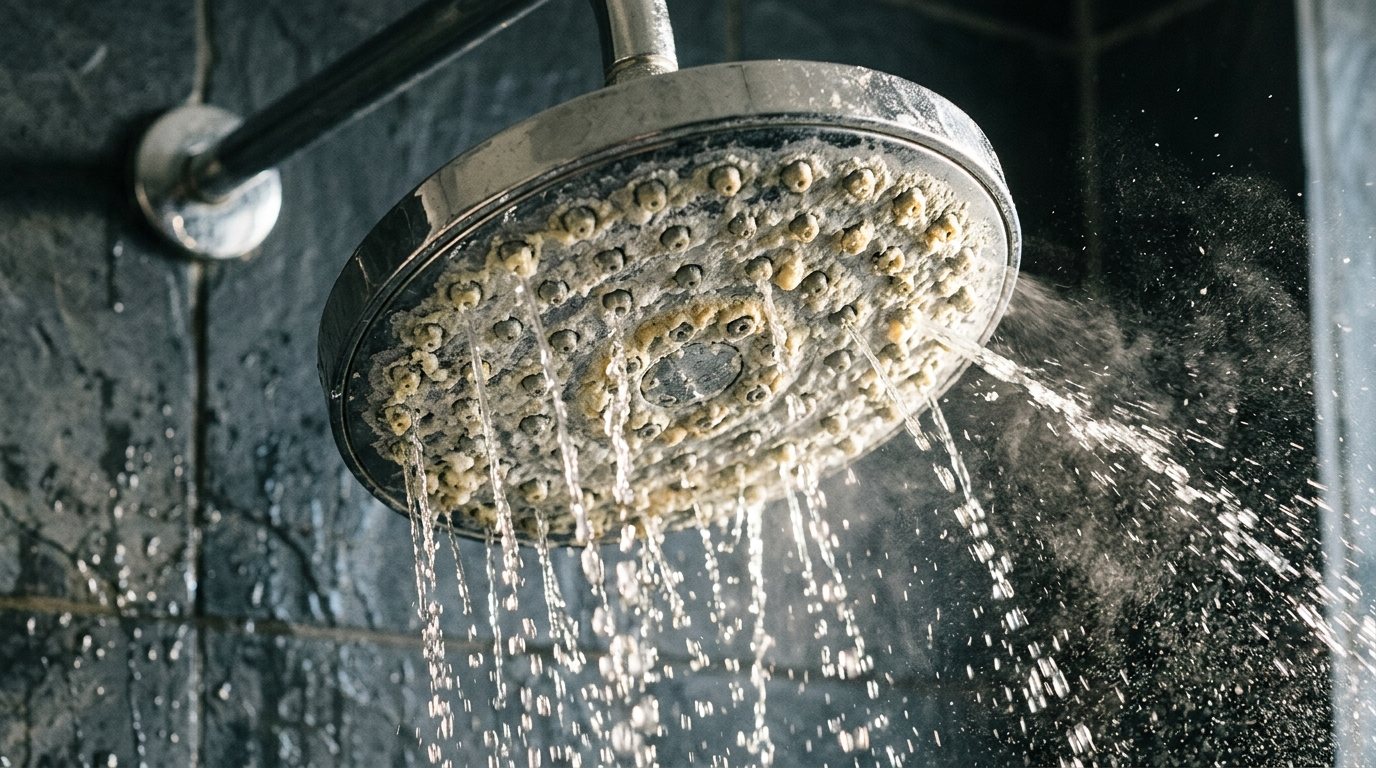
Your shower used to feel strong and even. Now half the jets spray sideways, a few have stopped completely, and there is a chalky white crust around the nozzles. If you live in a hard water area, this can happen within months.
The fix is usually simple and cheap. This guide covers the no-tools vinegar bag method, a deeper soak for heavy buildup, how to clear stubborn nozzles and the hidden screen and flow restrictor, how to protect delicate finishes, and how to keep mineral deposits from coming back.
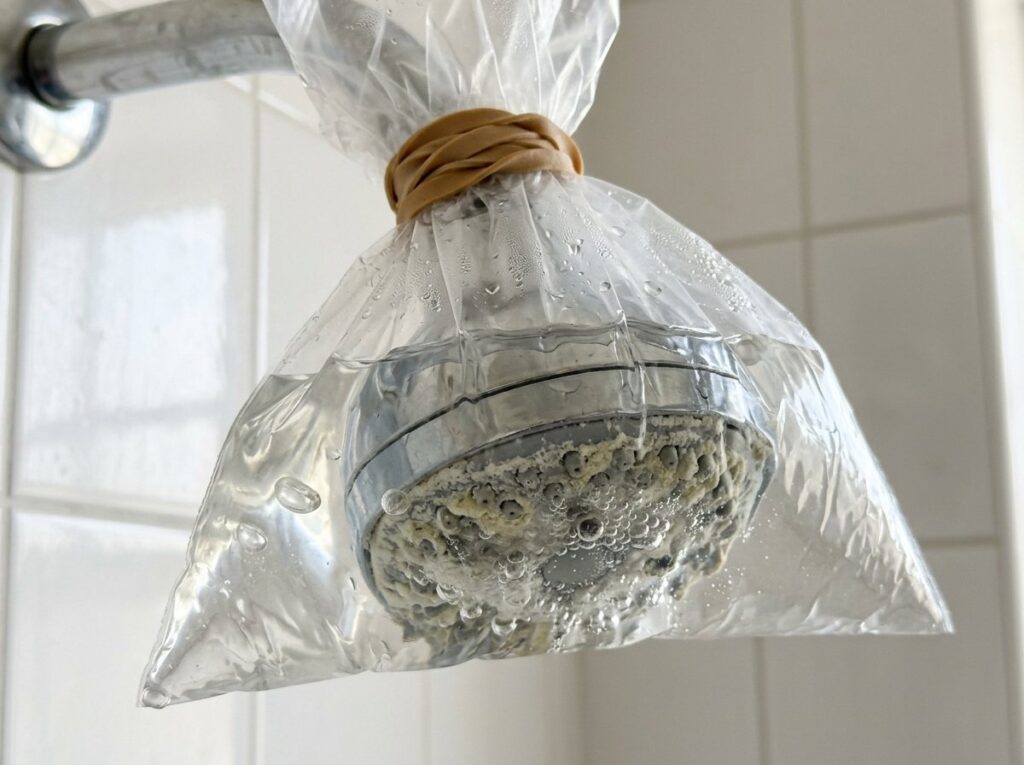
Quick answer: Fill a plastic bag with enough white vinegar to submerge the shower head, secure it with a rubber band or zip tie, and leave it for several hours or overnight. Remove the bag, run hot water for a minute or two, and scrub the face with an old toothbrush. For heavy scale or weak flow, unscrew the head, soak it fully, and rinse the small screen and flow restrictor inside the inlet.
Signs your shower head needs cleaning
- Jets spray at odd angles or some do not spray at all.
- Water pressure is weaker at the shower than at the tub spout or sink.
- White, gray or blue-green crust builds up around the nozzles.
- Dark spots or slimy residue appear on the face or inside the rubber nozzles.
- The shower head drips or sputters after you turn it off.
That crust is mostly calcium and magnesium left behind as hard water evaporates. Over time, it narrows each opening until the spray pattern breaks up. Vinegar works because its mild acid dissolves these mineral deposits.
Check your finish before you soak
Plain white vinegar is safe on standard chrome and most stainless steel. Some decorative finishes, such as brass, brushed nickel, oil-rubbed bronze and gold tones, can dull or discolor with long acid soaks. Look up your shower head’s care guide if you can, and if you are unsure, use the gentler approach in the table below.
| Finish | Vinegar soak | Gentler approach |
|---|---|---|
| Polished chrome | Usually fine, overnight if needed | Not usually needed |
| Stainless steel | Usually fine | Not usually needed |
| Brushed nickel | Short soaks only | Half vinegar, half water for about an hour, then rinse well |
| Oil-rubbed bronze, brass, gold tones | Avoid long soaks | Clean the nozzles only, or use a cleaner the manufacturer approves |
| Plastic or matte black | Usually fine for plastic; check matte coatings | Short soak, soft cloth only |
Safety note: Never mix vinegar or other acidic descalers with bleach. The combination releases chlorine gas. Run the bathroom fan or open a window, rinse the shower head thoroughly between products, and wear gloves if you use a commercial calcium and lime remover.
Tools and materials
- Distilled white vinegar
- Gallon zip-top plastic bag and a rubber band, zip tie or twist tie
- Old toothbrush or soft nylon brush
- Toothpicks or a straight pin for blocked nozzles
- Adjustable wrench or slip-joint pliers and a rag to protect the finish
- Bowl or container for a full soak
- Thread seal tape (often called plumber’s or PTFE tape)
- Needle-nose pliers or tweezers for the screen
- Microfiber cloth
Method 1: The vinegar bag (no removal)
This is the easiest method and works well for light to moderate buildup on a fixed shower head.
- Pour enough white vinegar into the bag to cover the face of the shower head when the bag is lifted into place. For a standard head, a cup or two is usually plenty.
- Slide the bag up over the head so the nozzles sit fully under the vinegar.
- Wrap a rubber band, zip tie or twist tie around the shower arm to hold the bag.
- Leave it for at least an hour for light deposits, or several hours to overnight for heavier scale, depending on your finish.
- Remove the bag and pour the vinegar down the drain.
- Run hot water through the head for a minute or two to flush loosened minerals.
- Scrub the face with a toothbrush, then clear any remaining blocked nozzles with a toothpick.
Method 2: Remove and deep soak
Use this method if the bag did not do enough, if flow is still weak, or if you want to clean the screen and flow restrictor inside the inlet.
- Lay a towel in the tub or shower pan so dropped parts do not go down the drain.
- Try to unscrew the head by hand, turning counterclockwise. If it will not budge, wrap the connecting nut with a rag and use a wrench, holding the shower arm steady with your other hand so you do not twist it inside the wall.
- Rinse the threads and look into the inlet for grit or debris.
- Submerge the whole head in a bowl of warm white vinegar, using a gentler mix and shorter soak for delicate finishes.
- Soak for several hours or overnight for heavy scale, then scrub and rinse.
- With the head off, run the shower briefly to flush any sediment out of the arm.
Reinstalling the shower head
Remove the old thread tape from the shower arm. Wrap new thread seal tape clockwise around the threads two or three times, so it does not unravel as you screw the head on. Thread the head on by hand, then snug it with the rag-wrapped wrench only if it drips. Overtightening can crack plastic shower heads.
Clearing clogged nozzles
Many shower heads have flexible rubber or silicone nozzles. Rub them with your thumb while water is running or after a soak, and loosened scale often pops right out. That simple habit, done weekly, keeps buildup from getting a foothold.
For metal or hard plastic faces, poke each blocked hole gently with a toothpick or straight pin. Go straight in and do not twist or force it, since you do not want to enlarge or scratch the opening. If several jets are still blocked after a soak, repeat the soak rather than digging harder.
Cleaning the screen and flow restrictor
Inside the inlet, where the head screws onto the arm, most shower heads have a small mesh screen and a plastic disc called a flow restrictor. Both trap grit and mineral flakes. The home repair site Ask the Builder calls a clogged flow restrictor the most common cause of poor shower pressure.
- With the head removed, look into the inlet and pull out the rubber washer if it sits on top.
- Lift out the mesh screen with needle-nose pliers or tweezers and rinse it. Scrub sticky debris with a toothbrush and a little dish soap.
- If the flow restrictor is removable, note which side faces the shower arm, ease it out, and clear its tiny holes with a pin.
- Rinse everything and reinstall the parts in the same order and orientation.
Do not drill out or throw away the flow restrictor to boost pressure. According to the EPA’s WaterSense program, standard shower heads use 2.5 gallons per minute and WaterSense labeled models use no more than 2.0 gallons per minute. Removing the restrictor raises your water and water-heating costs and may void the warranty. If cleaning does not restore a satisfying spray, a new shower head designed for good pressure at low flow is a better fix.
Still weak? Troubleshoot beyond the shower head
A quick test tells you where the problem is. Remove the shower head and turn on the water. If a strong stream comes from the arm, the problem is in the head. If the flow from the bare arm is still weak, the shower valve or your home’s water pressure is to blame.
| What you notice | Likely cause | What to do |
|---|---|---|
| Strong flow from bare arm, weak from head | Clogged nozzles, screen or restrictor | Deep soak and clean the inlet parts |
| Weak flow from bare arm | Clogged valve cartridge or supply problem | Check other fixtures, then the valve |
| Pressure changes as you turn toward hot or cold | Valve cartridge clogged or worn | Clean or replace the cartridge |
| Weak pressure at every fixture | Whole-house pressure issue | See our guide to low water pressure |
| Head drips after shutoff | Worn valve cartridge, or normal draining | Wait a minute; if it keeps dripping, repair the valve |
If every tap in the house is weak, read our guide to low water pressure in the house. A shower that keeps dripping after it is turned off usually has a worn cartridge, similar to the repair in our guide on how to fix a leaky faucet.
Handheld shower heads and hoses
Handheld heads are easier to clean because you can drop the whole wand into a container of vinegar. Unscrew the hose from the wand and from the shower arm, check the washers at each end, and flush the hose with water. Kinked or internally scaled hoses can restrict flow, and a replacement hose is inexpensive. Replace flattened or cracked washers while you have it apart.
How to prevent hard water buildup
- Wipe or rub the nozzles weekly. Thirty seconds with your thumb on rubber nozzles keeps them clear.
- Do a quick vinegar bag soak monthly. In very hard water areas, a short routine soak stops crust from hardening.
- Dry the face after showering. A quick wipe with a towel removes droplets before they evaporate and leave minerals behind.
- Consider a water softener. If scale also builds up on faucets, glass and your water heater, softening the water treats the cause.
- Keep the glass and tile clean too. Our guide to removing hard water stains covers doors, tile and fixtures.
Common mistakes to avoid
- Soaking delicate finishes overnight. Brass, bronze and some nickel finishes can be damaged by long acid soaks.
- Using a wrench without a rag. Bare jaws scratch and dent the finish.
- Twisting the shower arm. Hold the arm steady while you loosen the head so you do not loosen a fitting inside the wall.
- Enlarging the nozzle holes. Forcing metal tools into jets changes the spray pattern for good.
- Skipping the thread tape. Without it, the connection may drip.
When to call a pro
Cleaning a shower head is a DIY job, but call a plumber if you see these red flags:
- The shower arm is loose, cracked or turns inside the wall.
- Water leaks from behind the trim plate or shows up on the ceiling below.
- Flow is weak even with the head removed, or hot and cold pressure differ.
- Weak pressure affects the whole house.
According to HomeAdvisor’s plumber cost guide, most plumbers charge about $70 to $120 per hour, and service call fees typically range from $100 to $350, usually including the first hour. Flat rates for simple service calls typically run $100 to $400.
Frequently asked questions
How long should I soak a shower head in vinegar?
For light buildup, an hour is often enough. For heavy scale on chrome or stainless steel, several hours to overnight works best. Use shorter, diluted soaks on brass, nickel, bronze and gold finishes.
Can I clean a shower head without removing it?
Yes. The vinegar bag method cleans the face and nozzles without tools. You only need to remove the head to clean the inlet screen and flow restrictor or to soak a heavily scaled head fully.
Why is my shower pressure still low after cleaning?
Check the screen and flow restrictor inside the inlet, then run the shower with the head removed. If the bare arm still has weak flow, the shower valve cartridge or your home’s water pressure is the likely cause.
Is it OK to remove the flow restrictor?
It is better to clean it. Removing it increases water and energy use and may void the warranty. A shower head designed for strong spray at low flow is a better upgrade.
How often should I clean my shower head?
Wipe or rub the nozzles weekly and do a vinegar soak every month or two. In very hard water, monthly soaks keep scale from building up.
The bottom line
A vinegar soak, a toothbrush and a toothpick fix most clogged shower heads in an evening. Check your finish first, clean the screen and flow restrictor if pressure stays weak, and use the bare arm test to rule out the valve. A quick weekly rub and an occasional soak keep hard water from undoing your work.