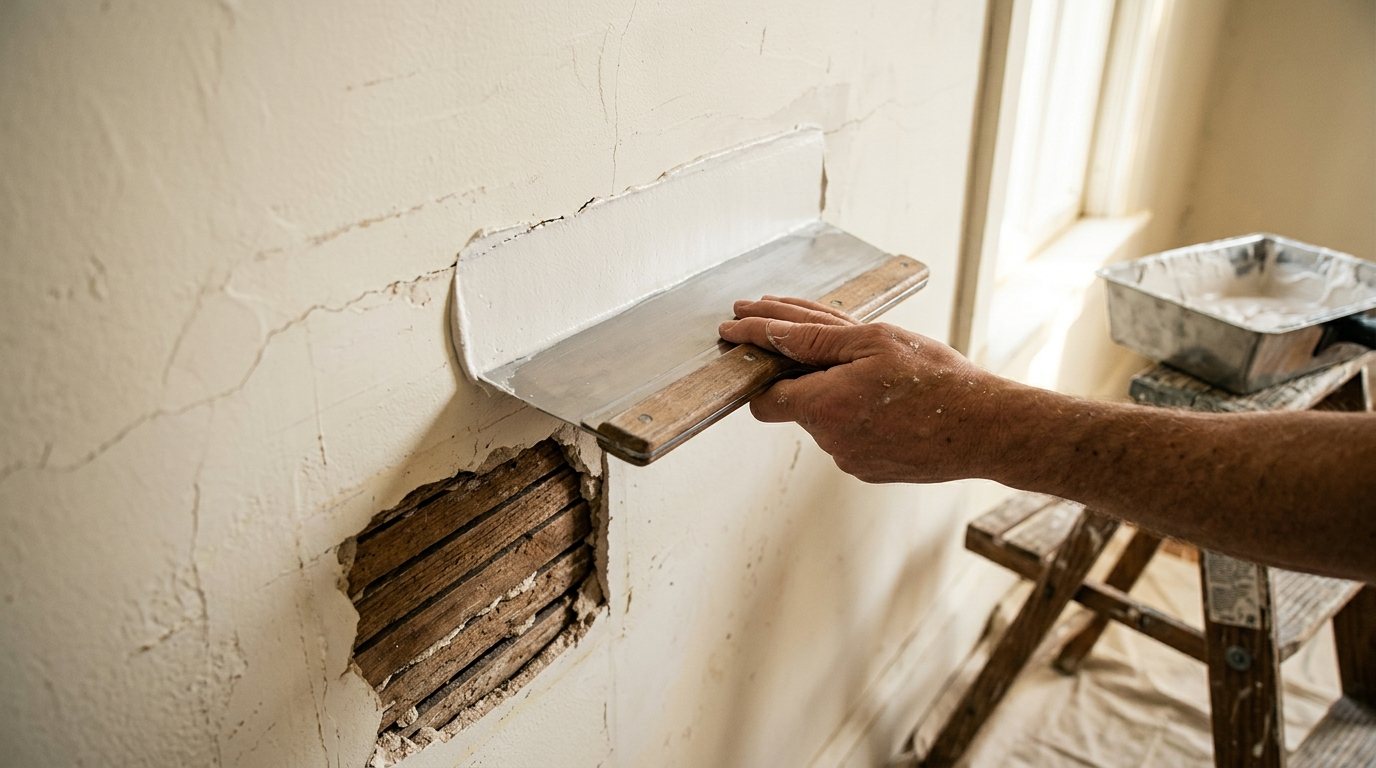
Old plaster walls are solid, quiet and full of character, but they crack. Maybe a hairline crack keeps reappearing over a doorway, a chunk fell out when you removed a picture hook, or part of the ceiling feels spongy when you press on it. Drywall repair tips do not quite fit, and you do not want to make things worse.
This guide explains how to tell plaster from drywall, how to fix hairline cracks, larger cracks and holes, how to reattach loose plaster with plaster washers, which patching materials to use, and how to work safely in older homes where lead paint is likely.
Quick answer: Press around the damage first. If the plaster moves, reattach it to the lath or framing with screws and plaster washers before patching. Open cracks into a shallow V, fill with setting-type joint compound, bridge them with fiberglass mesh tape, then finish with thin coats of all-purpose compound, sand, prime and paint. In homes built before 1978, test for lead before you sand or scrape.
Plaster vs drywall: how to tell what you have
Traditional plaster was troweled on in layers over wood lath (thin wooden strips), and later over gypsum or metal lath. Drywall is factory-made gypsum board with a paper face, screwed to studs in sheets. Many homes built before the mid-20th century have plaster, and some have both after past remodels.
- Push-pin test: A thumbtack pushes easily into drywall but barely dents plaster.
- Knock test: Drywall sounds hollow between studs; plaster sounds solid and dull.
- Look at an edge: Remove an outlet or switch cover (with the power off). Plaster walls are usually thicker, and you may see the lath behind; drywall shows a paper face and a thin gypsum core.
- Surface feel: Plaster is very hard and often slightly wavy; drywall is flatter with taped seams.
Plaster holds onto the lath with keys, small blobs of plaster that squeeze through the gaps in the lath and harden. When those keys break, from settling, vibration or a leak, the plaster can bulge, sag and eventually fall. That is why checking for loose plaster comes before any patching.
Tools and materials
- Utility knife or a crack-opening tool, and a stiff putty knife
- 6 inch and 10 or 12 inch taping knives, plus a mud pan
- Setting-type joint compound (powder that hardens chemically, sold in 20 to 90 minute versions)
- Premixed all-purpose or lightweight joint compound for finish coats
- Self-adhesive fiberglass mesh tape
- Plaster washers and 1 5/8 to 2 inch screws, or a plaster adhesive injection kit
- Drill with a masonry bit for pilot holes
- Bonding agent and a spray bottle of water
- Sanding sponge or block, drop cloths, safety glasses and a dust mask or respirator
- Primer suitable for patched plaster
Which patching material to use
| Material | Best for | Notes |
|---|---|---|
| Lightweight spackle | Nail holes and tiny dings | Fast and easy to sand, too soft for cracks |
| Setting-type joint compound | First coats in cracks and holes | Hardens chemically, shrinks little, bonds well to plaster, hard to sand |
| All-purpose joint compound | Final thin coats and feathering | Easy to spread and sand, shrinks if applied thick |
| Fiberglass mesh tape | Bridging cracks so they do not reopen | Embed it in setting compound, not lightweight spackle |
| Bonding agent | Deep fills over old plaster or lath | Stops dry plaster from pulling water out of the patch |
| Patching or base coat plaster | Rebuilding thick, deep areas | Closest match to original plaster |
| Drywall piece | Large holes where lath is missing | Shim it to match the plaster thickness |
Setting-type compound is the workhorse for plaster. Premixed compound dries by evaporation and stays relatively soft, while setting compound cures hard like the plaster around it. Mix only what you can use before it sets.
How to fix hairline cracks
- Check for movement. Press firmly along both sides of the crack. If it feels spongy, secure it with plaster washers first (see below).
- Open the crack. Run a utility knife or crack opener along it to cut a shallow V about 1/8 inch wide. This removes loose material and gives the compound something to grip.
- Clean and dampen. Brush out dust and mist the crack lightly so dry plaster does not suck water out of the patch.
- Fill and tape. Press setting compound into the V, then embed fiberglass mesh tape over it. For a short, stable crack you can skip the tape, but taped cracks are far less likely to return.
- Finish. Apply two or three thin coats of all-purpose compound, each a little wider than the last, feathering the edges. Sand lightly between coats.
A wall covered in spiderweb cracks, where the plaster is still firmly attached, is better handled by covering the whole surface with a fiberglass mat system or a skim coat. Our guide on how to skim coat a wall walks through that process.
Pro tip: Hold a work light flat against the wall so it skims across the surface. Low-angle light reveals cracks, bulges and high spots you will not see under ceiling lights, and it shows whether your finished patch is truly flush.
How to reattach loose plaster with plaster washers
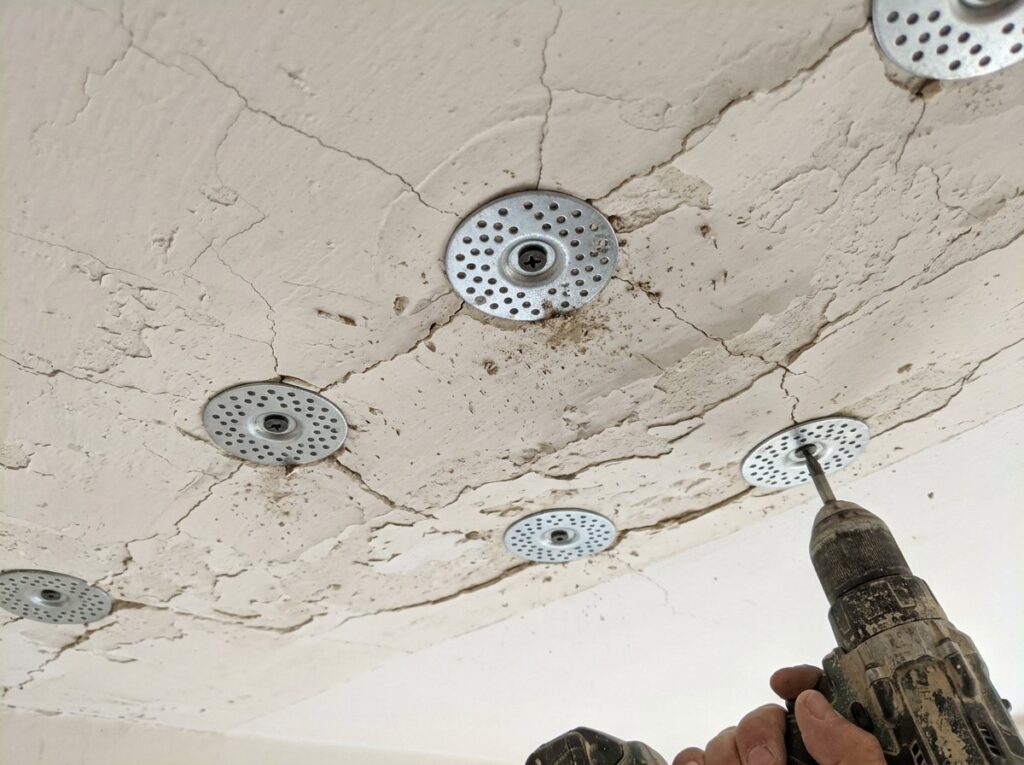
Plaster washers are thin, perforated metal discs that spread a screw’s holding power over a wider area, so the screw pulls loose plaster back against the lath without punching through it. Work slowly; pushing too hard can crack the plaster further.
- Find the framing. Locate studs or ceiling joists and mark them. Our guide on how to find a stud covers methods that work on plaster.
- Drill pilot holes. Use a masonry bit to drill through the plaster only, so the screw does not crack it on the way in.
- Drive screws with washers. Gently push the plaster back and drive 2 inch screws with washers into the framing about every 6 to 8 inches, as Family Handyman suggests, plus a few into the lath around the edges of the loose area.
- Snug, do not crush. Stop when the washer sits flat and tight. Over-driving can crack the plaster or split old lath.
- Cover the washers. Skim over them with joint compound in two or three thin coats until they disappear.
Plaster adhesive injection kits are an alternative. You drill small holes, vacuum out dust, inject adhesive between the plaster and lath, and hold the plaster in place with temporary screws and washers until it cures, which avoids visible hardware. This Old House’s plaster repair guide shows both methods.
How to fix larger cracks and holes
Large cracks
Secure any loose plaster on both sides first, then open the crack and remove crumbling material back to sound edges. Fill with setting compound, embed mesh tape, and apply a second coat of setting compound. Finish with wide, thin coats of all-purpose compound, feathering out well beyond the crack so the repair does not show as a bump.
Holes with the lath still intact
- Remove loose plaster with a putty knife until you reach solid edges.
- Brush on bonding agent or dampen the edges and lath.
- Fill with setting compound or patching plaster in layers, letting each set before the next.
- Stop the fill slightly below the surface, then finish with thinner coats of compound and sand smooth.
Holes where the lath is missing
Cut the opening to a neat rectangle back to solid plaster. Cut a piece of drywall to fit, shim it with strips so its face sits flush with the plaster, and screw it to the studs or remaining lath. Tape the seams with mesh tape and setting compound, then finish like a drywall patch. Our guide on how to patch a hole in drywall covers the finishing steps.
Lead paint and dust: work safely in older homes
If your home was built before 1978, assume the paint on your plaster may contain lead until a test says otherwise. The EPA’s Renovation, Repair and Painting (RRP) program notes that even small amounts of lead dust from sanding and cutting can poison children. The RRP rule requires paid contractors working in pre-1978 homes to be certified in lead-safe practices, and EPA urges DIYers to follow the same practices.
Safety note: Before disturbing old paint, test it with a lead test kit or have it tested. If lead is present or likely, keep children and pregnant family members out of the area, cover floors with plastic, mist surfaces before scraping, never dry-sand or use a power sander without a HEPA dust collector, and clean up with a HEPA vacuum and wet wiping.
When to call a pro
Small cracks and fist-size holes are good DIY repairs. Call a plaster contractor or general contractor if you see:
- A ceiling that sags or bulges over a large area, which can fall without warning
- Cracks that keep widening, run diagonally from door and window corners, or come with sticking doors, which can point to structural movement (see our guide on cracks in walls and ceilings)
- Water damage, crumbling plaster or mold
- Peeling paint in a pre-1978 home that you are not equipped to handle lead-safely
According to Angi’s plaster repair cost guide, professionals charge about $55 to $120 per hour, with minimums around $75 for small patch jobs. Angi lists typical per-square-foot costs of about $22 for holes, $30 for cracks, $80 for sagging plaster and $100 for water damage. Its overall average is about $3,840, though a few small repairs cost far less.
Frequently asked questions
Can you use drywall compound on plaster walls?
Yes. Setting-type joint compound bonds well to plaster and is the best choice for first coats in cracks and holes. Use premixed all-purpose compound only for the thin final coats.
Why do cracks in plaster keep coming back?
Cracks return when the plaster is loose or the house is still moving seasonally, and plain compound cannot flex. Secure loose plaster with washers, then bridge the crack with fiberglass mesh tape embedded in setting compound.
Should I replace plaster with drywall?
Usually not. Plaster is dense, quiet and durable, and Angi suggests replacing it mainly when you are tearing out walls for a renovation anyway or mold is widespread. Drywall is cheaper to install but involves major demolition, dust and possible lead exposure.
Are plaster washers visible after painting?
Not if you finish them properly. Two or three thin coats of joint compound, feathered wide and sanded, hide them completely.
What is the best primer for plaster patches?
Use a primer labeled for patched walls or new plaster and joint compound. It seals the patch so it absorbs paint the same way as the surrounding wall and does not show through as a dull spot.
The bottom line
Successful plaster repair starts with making sure the plaster is firmly attached. Reattach loose areas with plaster washers, fill cracks and holes with setting compound and mesh tape, finish with thin feathered coats, then prime and paint. In any home built before 1978, test for lead before you sand, and call a pro for sagging ceilings or damage that keeps spreading.